Automated Testing of xLights – Part 1: Rendering

Introduction

Testing is an important part of software development, as it helps the team understand the behavior of the program before it is released. Manual testing — trying a bunch of things to see what happens — gets tiresome quickly, and so the temptation is to not do it very often. A better way to learn as much about the behavior of the software as quickly and painlessly as possible is to use an automated approach.

The simplest form of automated testing is regression testing — seeing if the software does the same thing it did last time it was presented with the same input scenario. Changes detected by regression testing can then be reviewed, to see if they were caused by intentional improvements, or are “regressions” in quality that should be corrected before release. The easier it is to run automated regression tests that have good “coverage” of the codebase, the more “freedom of action” programmers have to make changes without fear of breaking things.

While automated regression testing is often easier said than done, xLights does offer some obvious opportunities. Rendering is an example of something that is complicated enough to break, where active development is desired, and where automated regression testing is straightforward enough. Why? Because we have:

  • An input we can capture — the .xsq sequence file (plus the layout and other show folder contents)
  • An output we can capture — the .fseq output file
  • Means to drive the program externally for integration into an automation scheme — various HTTP commands for batch render and the like

Approach

Correctness Testing

Correctness testing is quite straightforward:

  1. Start with a sequence.
  2. Make sure the output render looks good.
  3. Save it as the “known good” or “expected” output.
  4. In the future, compare the results of render to the “expected” output to see that correctness is maintained.
  5. If there is a difference between the expected output and a test result, establish if the change was good / intentional, or bad / accidental. If the former, update the expected output, if the latter, fix whatever broke.

There are modest technical and practical concerns here, all quite surmountable.

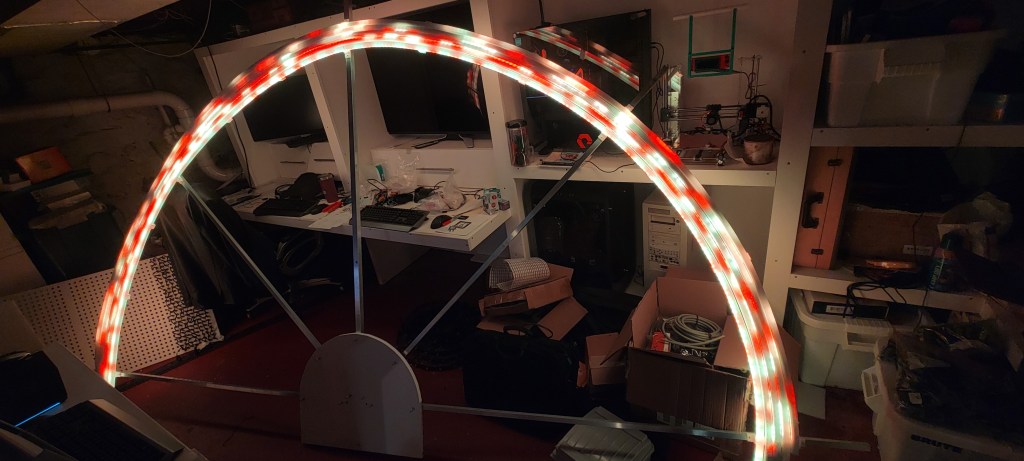
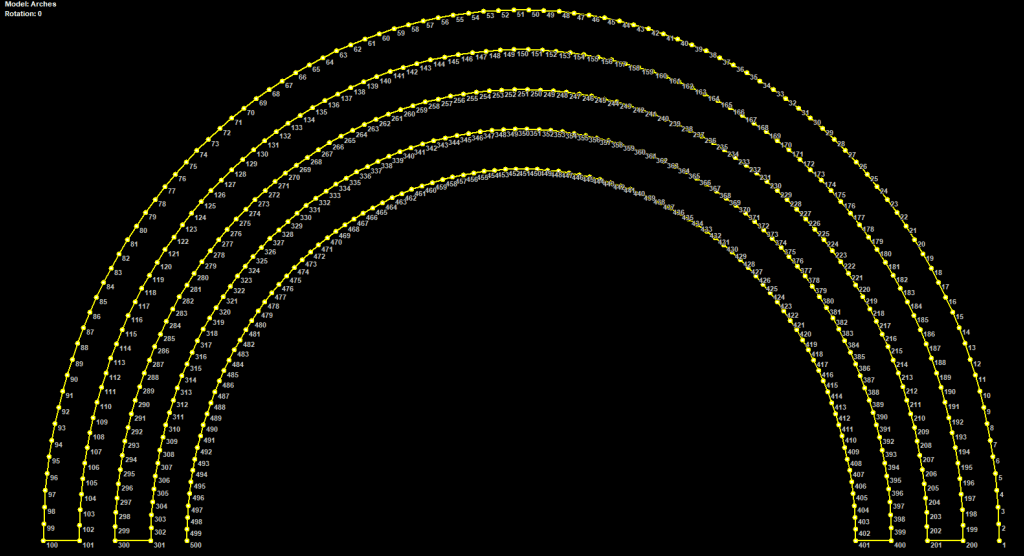
The first thing is to have a suite of sequences with expected outputs. A good correctness test suite has a lot of “coverage” – exercises all the parts of the code – without taking an excessive amount of time to run, and without being subject to false positives, “noise”, or “churn”. Said another way, the tests should only test what they intend to test, and not be brittle and detect differences when other things change. This is the part where someone has to do real, hard work. I have started what I call the “Supercoverage Test Set” (SCTS)… it hits most of the effects and their parameters a few times (for gaps, see “Future Work” below), and runs in single digit minutes. Of course, “Supercoverage” here may as well mean “superficial coverage”, but it has already detected several things (See “Results” below).

Another thing is to keep the test suite in version control (e.g. github) so that tests and results are not lost, so that history is kept, and so that many people can access it. (Among other reasons.)

Practical considerations arise. .fseq files are not great because:

  1. They’re a bit big.
  2. They contain unique IDs and stuff that change for no reason at all, so there is noise.
  3. They’re binary, and compressed, and therefore inscrutable when it comes to telling how they changed. Because of the way compression units are done, they could even change without the uncompressed contents changing.

The solution to that was to develop a tool, written in python, fseqFile.py. (For details, see Tool Details below.) To fix issue #1, the tool calculates a summary, the CRC of the .fseq file uncompressed contents, which is much smaller than the .fseq file itself, but will almost certainly change when the contents change. To fix issue #2, the tool calculates the CRC only on the part of the files we care about, and breaks the CRCs down into sections based on model and timing region. To fix issue #3, the CRC report is saved in JSON, so that it can be interpreted in a reasonable way by general diff tools, and in an even better way by a special-purpose comparison program. All of these have been written and are working well.

Consistency Testing

Given the limitations of a purpose-built test set, it makes sense to try the regression tests on suites of real-world sequences, such as people’s shows, vendor offerings, google drive, and so on. The issue here is that we don’t know if xLights is currently rendering them correctly or incorrectly. Still, it is possible to run the suites repeatedly to see if anything changed from one version to the next, so I took this approach on my own 2021 show folder (2022 is coming soon).

During the course of consistency testing there were several technical challenges encountered:

  • There are cases where xLights intentionally doesn’t give the same answer, basically anything random, like the placement of circles in the circles effect, text that depends on the date, and so on. (See Challenges and Workarounds.)
  • There are bugs in xLights that cause renders to be inconsistent from one run to the next. (See Results.)

In addition to the technical challenge, there may be issues with capturing the test suite for others to use. (For example, my show folder contains copyrighted vendor sequences, copyrighted songs, and so on, so we could not use it as an official test suite.) It is also large, and highly skewed toward certain effects (like video effects that PixelProDisplays and some other vendors overlay on the source effects to ensure a consistent experience for their customers).

Performance Testing

Performance testing is an obvious addition to most forms of regression testing, including that outlined above. All that is needed is to collect how long each render takes. There are some considerations:

  • Tests need to run long enough that they are not subject to noise of startup, teardown, etc.
  • The machine used for comparison points has to be the same, or comparable, otherwise you would not get the same timing consistently.
  • As effect rendering time involves mélange of code routines, performance represents an aggregate of everything in the sequence. Performance changes for effects that are not represented sufficiently in the test suite would not be detected. To mitigate this, per-effect performance test sequences would be helpful.

Results on my 2021 show folder show reasonable consistency across xLights versions from 2022 (See results below). Collection of performance data and generation of spreadsheet files is automated by a tool, see “Tool Details” below.

Challenges & Workarounds

The first challenge with correctness and consistency testing using the “identical output files” / CRC approach outlined above is with effects that are intentionally random. This includes strobes, shapes, circles, lines, twinkle, meteor, snow, and several others with completely random placement, plus effects with random modes such as VU meter and tendril. The approach for solving this was to introduce a per-effect pseudo-random number generator (PRNG) state, which is consistently seeded by taking the effect, the start time, the model, and other parameters so that each effect gets unique “random” values, but there is consistency from run to run. There are a few exceptions (see future work below), but changes are mostly made and available on a branch. (For the curious, the PRNG used is xoroshiro128+, which is state-of-the-art.

The second approach to consistency is to disable unstable effects within the sequence; xsqFile.py can do this (see the Tool Details section below). While it does make the sequence work, obviously the downside is that the tests become completely blind to issues in the disabled effects.

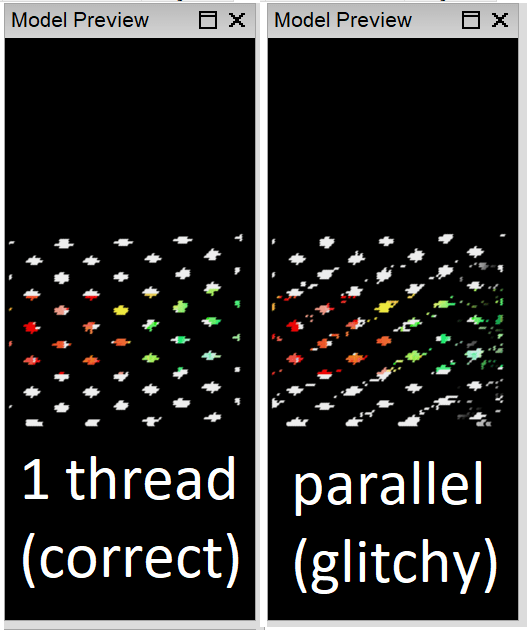
A second source of instability in the render result is caused by parallel implementations that may render overlapping objects in different orders. For example, if meteors overlap each other, whichever rendered last will show, and this could differ if the meteors are rendered in parallel. The best solution here is to improve the render algorithm to make it consistent, but the short-term workaround is to disable parallelism on the testing branch, or disable the affected effects if code changes are not possible.

A final source of instability is layouts with nondeterministic behavior. Using the same node twice in a submodel or group is an invitation for inconsistency, and so layouts must be scrubbed with “check sequence” and such glitches removed before they are suitable for inclusion in the correctness or consistency test suites. (For performance tests, this likely does not matter.)

Results

Sometimes, just creating a test suite with extensive coverage means you could be the first person to use a feature in a while, and you might encounter some things that are broken. Here are some things I found while creating the supercoverage tests:

  • Crash in single strand FX when a lot of color boxes are checked (#3729)
  • Value curve for ripple rotation not working (#3726/#3727) (Fixed 2023.04)

Because I just added the test suite, and it took a lot of work to make the random number generators stable to get consistent results, you can’t expect stable results from backtesting old versions. It is therefore somewhat difficult to tell what kind of past changes would have been caught by automated regression tests, but here are some examples I found by trying:

  • The maximum radius of a fan effect was changed in 2022.24; based on how value curves work this caused changes in how existing effects render.
  • 2022.21 saw some changes in how “garlands” is applied to a group with buffer style “default model as pixel”. Some butterfly effects also changed at this time. Not sure what caused the change and if it was intentional or not.
  • The Fractal/Ivy setting on the wave effect was broken (between 2022.13 and 2022.19, but has since been fixed so I did not narrow it down to an exact change).
  • There were changes to piano and music at some point between 2021.39 and 2022.13.
  • And several more, but mostly they were new features that were introduced, so running them on older versions that didn’t include the features naturally produced different results.

While it is hard to run the consistency suite with so many random effects out there, consistency testing did find a couple of threading problems in xLights:

  • Heap corruption crash in text effect (#3728)
  • Crash in shape effect with unicode characters as shapes (not yet filed)
  • Parallelism in moving data from nodes to render buffer causes poor quality. (This issue, #3740, is fixed in 2023.04.)
  • There are instabilities in meteor, twinkle, spirals in 3D mode, and several other effects, however they have not (yet) been seen to produce awful render quality like that seen in warp.
Unstable render of the warp effect caught by consistency testing…

Performance testing was conducted on my 2021 show. (Backtesting the 2022 show is hardly sensible, as it uses effects that were not present in versions prior to 2022.19). In aggregate, render performance improved slightly in xLights releases from tail end of 2021 to date. Many sequences improved, and many stayed the same. Currently, there has not been enough testing to provide visibility into what specific code commits caused performance to change, but an effort to track this, at least going forward, is in the future plans.

xLights render times for a selection of MoC’s 2021 show folder sequences

Tool Details

xlTest.py

This is the main regression test driver script, capable of executing the majority of a regression test cycle, depending on which command-line options are specified. It uses capabilities from many of the modules below, should it be desired to separate the duties.

For either a single .xsq file or a suite (directory) it will, optionally:

  • Start / Stop xLights
  • Switch to the show folder
  • Perform the renders
  • Calculate the CRCs and write to resulting summary files. It will do this at the model+timing level, but only if requested (by option).
  • Compare the summaries to the baseline and create reports of differences
  • Store the performance results

To do these things, xlTest.py needs to know paths to the xlights binaries, suite show folder, xsq files, expected CRC summaries, and output directories.

See the command-line help for the exact syntax.

perf2xlsx.py

This tool will combine the performance results from multiple run directories into one .xlsx spreadsheet, making one row per sequence and one column per xLights render run tested. The command line takes the output file name, and a list of input perf_report.json files; see the command-line help for details.

xlDo.py

This is my wrapper for making xlDo or other HTTP calls to xLights. In this context, its subroutines are used for starting xlights, switching show folders, and rendering sequences, nothing else.

fseqFile.py

This contains the subroutines for reading .fseq files, decompressing them, and calculating CRCs. With no other information, it can calculate CRCs globally and by frame. Optionally, it will read controllers and models from the show directory, allowing CRCs to be calculated per model, and it can load timing tracks from an .xsq file to calculate CRCs by timing interval, or timing interval + model combination. It can be run as a standalone program to produce a JSON summary of a .fseq file; see the command-line arguments produced by the help.

xsqFile.py

This contains logic for parsing .xsq files, and is used as a library for some of the other tools. It is not a complete implementation, but is able to get information about timing tracks, iterate through effects, and disable effects. Run from the command line, it will go through a folder of .xsq files and produce new ones with the unstable effects disabled; this can be done in two modes, one reflective of unstable effects in xLights as of 2023.02, and another reflective of the development branch where the attempt is being made to stabilize all render results. See command line help for details.

compareFseqCRCs.py

This contains logic for comparing JSON CRC summaries produced by fseqFile.py. It is used as a library by the main test driver, but can also be used standalone to compare two sequence summaries. See the command-line arguments for details.

Future Work

Making a determination of the effect of code changes on “typical” performance requires a test suite that is representative of “typcial” workloads. Whether we have to build that, can use gdrive stuff, or can get help from sequence vendors is an open investigation area.

There are many code changes on an xLights fork to merge in to get the deterministic behavior on master. Merging these would require some additional validation (performance, for example), and agreement from the xLights primary committers. After that, it would be possible to integrate the tests more deeply into the development process, so that they run in the background and keep us all safe from unintended changes.

One of the straightforward things to chip away at is expansion of the unit test suite, which currently lacks (at least) the following things:

  • DMX, Servo, Glediator effects
  • More thorough tests on shaders, faces, and states
  • Testing of single strand FX
  • Text effects with string substitutions
  • Larger models – this would be essential for per-effect render performance testing also
  • Roto-Zoom
  • In/Out transitions
  • Morph
  • More thorough tests of render styles and other things on that tab
  • Chroma Key, Brightness, Contrast, HSV adjustment, Sparkles Reflect Music
  • Handling of a “rendered for” date for text effects and shaders

There are some things are still not deterministic on the development branch:

  • Color palettes set to random blend
  • Meteor, twinkle, and kaleidoscope (at least) have nondeterministic parallelism behavior on large renders

And, most obviously, automated testing should extend to aspects of xLights (and xSchedule) beyond rendering.

Sequences You May Have Seen at MerryOnCherry in 2022

My show is like a crummy commercial for vendors. Without the sequences from vendors and individuals, all I would have is a lifeless mess of tangled cables and plastic cardboard.

Christmas 2022 – After December 25

This was a 2.5 hour playlist, two major variants, consisting of selections from:

SongArtistSequencer
All The Small ThingsBlink 182Pixel Pro Displays
BegginManeskinRGB Sequences
Be Our GuestBeauty And The BeastSequence Solutions
Carol Of The Bells – Epic VersionSamuel KimSequence Solutions
Carol Of The BellsLindsey StirlingRGB Sequences
Cartoon Network MashupMagical Light Shows
Christmas DubstepNeoclassicxTreme Sequences
Crazy Little Thing Called LoveBrian SetzerPixel Pro Displays
CrystallizeLindsey StirlingSequence Solutions
Dance Of The Sugar Plum FairiesMobius8 vs FyerFairy Pixel Dust
Danger ZoneKenny LogginsBF Light Shows
Disney PrincessesMagical Light Shows
Don’t StopFleetwood MacShowstopper Sequences
Fancy LikeWalker HayesShowstopper Sequences
Final Count DownEuropePixel Pro Displays
Get This Party StartedP!nkShowstopper Sequences
Goodbye CoronaPrairie JoePixel Pro Displays
Greatest ShowGreatest ShowmanxLights Around The World
HappyPharrell WilliamsMagical Light Shows
Home For The HolidaysPerry ComoPixel Pro Displays
Ice Ice BabyVanilla IceVisionary Light Shows
Ice StormLindsey StirlingVivid Sequences
Jingle BellsBing Crosby and the Andrews SistersPixel Pro Displays
Let It SnowMichael BubleMagical Light Shows
LevitatingDua LipaBF Light Shows
Little Mermaid MashupLittle Mermaid – DisneyVisionary Light Shows
Livin On A PrayerBon JoviRGB Sequences
Marshmallow WorldFrancesca BattistelliPixel Pro Displays
MemoriesMaroon 5Pixel Pro Displays
My Favorite ThingsPentatonixShowstopper Sequences
The Nutcracker
Act II, Scene 3, Op. 71, TH 14
“Divertissement”
Peter Ilyitch Tchaikovsky
Kirov Opera and Ballet Theatre Symphony Orchestra
Visionary Light Shows
Poker FaceLady GagaPixel Pro Displays
Queen Of The Winter NightTrans Siberian OrchestraPixel Pro Displays
RasputinMajestic x Boney MRGB Sequences
RoarKaty PerryRGB Sequences
Sleigh Ride101 StringsMagical Light Shows
Snow WaltzLindsey StirlingEFL Sequences
Somewhere Over The Rainbow
What A Beautiful Day
Iz (Israel Kamakawiwo’ole)xTreme Sequences
Take On MeAhaMagical Light Shows
TSO MedleyTrans Siberian OrchestraxTreme Sequences
Walking In A Winter Wonderland
Don’t Worry Be Happy
PentatonixxTreme Sequences
We Don’t Talk About BrunoEncantoRGB Sequences
We Three GentlemenLidsey StirlingxTreme Sequences
What Else Can I DoEncantoPixel Pro Displays
A Whole New WorldAladdinRGB Sequences
You’ve Got A Friend In MeToy StorySequence Solutions
ZeroImagine DragonsxLights Around The World

Christmas 2022

This started as a 1-hour loop on Nov 25, with several song changes each night, and ended as a set of 5 1-hour blocks with few duplicates. All songs were from the list below:

SongArtistSequencer
12 Days Of ChristmasBob & Doug McKenzieFairy Pixel Dust
12 Days Of ChristmasStraight No ChaserPixel Pro Displays
All I Really Want For ChristmasLil JonShowstopper Sequences
Baby Please Come HomeDarlene LovePixel Pro Displays
Carol Of The BellsBarlowgirlDoug Y
Carol Of The Bells – Epic VersionSamuel KimSequence Solutions
Carol Of The BellsLindsey StirlingRGB Sequences
Children’s Christmas MixxTreme Sequences
Christmas Can CanStraight No ChaserMagical Light Shows
Christmas Don’t Be LateAlvin And The ChipmunksShowstopper Sequences
Christmas DubstepNeoclassicxTreme Sequences
Christmas In ParadiseUs The DuoShowstopper Sequences
Christmas NutchrackerElectric Sugar PlumPixel Pro Displays
Christmas Rick RollChristmas Vacation / Rick AstleyBF Light Shows
The Christmas SongNat King ColeEFL Sequences
The Christmas SongNat King ColexTreme Sequences
Christmas TreatJulian CasablancasShowstopper Sequences
Christmas TwistSi CranstounShowstopper Sequences
Christmas Without YouAva MaxRGB Sequences
Cozy Little ChristmasKaty PerryShowstopper Sequences
CrystallizeLindsey StirlingSequence Solutions
Dance Of The Sugar Plum FairiesMobius8 vs FyerFairy Pixel Dust
Diddly SquatTasha LaytonVivid Sequences
Disco SantaHoliday ExpressPixel Pro Displays
Dominic The DonkeyLou Montegdrive; Holiday Sequences
Don’t Be A JerkSponge BobPixel Pro Displays
Don’t Stop The Santa ManRock SugarPixel Pro Displays
Favorite Time Of YearCarrie UnderwoodPixel Pro Displays
Feliz NavidadJose PelicanoShowstopper Sequences
Frosty The SnowmanShowstopper Sequences
Grandma Got Runover By A ReindeerElmo & PatsyPixel Pro Displays
Grinch (Classic)Thurl RavenscroftxTreme Sequences
Have Yourself a Merry Little ChristmasDenmark & WinterPixel Pro Displays
Here Comes Santa ClausBing CrosbyPixel Pro Displays
Here Comes Santa ClausBing CrosbyxTreme Sequences
Holly Jolly ChristmasMichael BublePixel Pro Displays
Home For The HolidaysPerry ComoPixel Pro Displays
Ice StormLindsey StirlingVivid Sequences
It Must Be SantaBob DylanPixel Pro Displays
It’s Beginning To Look A Lot Like ChristmasMichael BubleShowstopper Sequences
Jing A LingThe Andrews SistersJolly Jingle Sequences
Jingle Bell RockBobby HelmsShowstopper Sequences
Jingle BellsBing Crosby and the Andrews SistersPixel Pro Displays
Jingle Jingle JingleRudolphPixel Pro Displays
Joy To The WorldBob RiversPixel Pro Displays
Light of ChristmasOwl City featuring TobymacPixel Pro Displays
Little Saint NickBeach BoysPixel Pro Displays
Marshmallow WorldFrancesca BattistelliPixel Pro Displays
Mele KalikimakaBing Crosbygdrive
Mele KalikimakaBing CrosbyMagical Light Shows
MistletoeJustin BieberxTreme Sequences
Mr. SantaThe LollipopsPixel Pro Displays
Queen Of The Winter NightTrans Siberian OrchestraPixel Pro Displays
Rockin Around The Christmas TreeNewsongPixel Pro Displays
Rockin Around The Christmas TreeBrenda LeeShowstopper Sequences
Rudolph The Red Nosed ReindeerBurl IvesShowstopper Sequences
Santa Bring My Baby BackTrainPixel Pro Displays
Santa ClausApologetiXPixel Pro Displays
Santa Tell MeAriana GrandeShowstopper Sequences
SarajevoTrans Siberian OrchestraMagical Light Shows
Season’s Upon UsDropkick MurphyShowstopper Sequences
Silver BellsBing CrosbyxTreme Sequences
Skinny SantaJD McPhersonPixel Pro Displays
Sleigh Ride101 StringsMagical Light Shows
Sleigh RideJohnny MathisxTreme Sequences
Sleigh RidePentatonixPixel Pro Displays
Snoopy’s ChristmasRoyal GuardsmenSequence Solutions
Snow Miser & Heat MiserRich ChambersSequence Solutions
Snow WaltzLindsey StirlingEFL Sequences
Step Into ChristmasElton JohnPixel Pro Displays
Sugar And BoozeAna GasteyerPixel Pro Displays
Takin’ Care Of ChristmasRandy BachmanxTreme Sequences
Toy SackBob RiversxTreme Sequences
TSO MedleyTrans Siberian OrchestraxTreme Sequences
Twas The Night Before ChristmasFamily ForcexTreme Sequences
Up On The House TopPentatonixSequence Solutions
We Need A Little ChristmasPercy Faith and His OrchestraxTreme Sequences
We Three GentlemenLindsey StirlingxTreme Sequences
We Wish You A Merry ChristmasWeezerPixel Pro Displays
What Christmas Means To MeStevie WonderPixel Pro Displays
Where Are You ChristmasFaith HillPixel Pro Displays
White ChristmasThe DriftersPixel Pro Displays
Wonderful ChristmastimeUs The DuoPixel Pro Displays
xTreme Sequences Classic MedleyVariousxTreme Sequences

Veterans Day 2022

This was a short loop run only on one day.

SongArtistSequencer
God Bless the USA and Armed Forces MedleyThe American PatriotsxTreme Sequences
My HeroFoo FightersBF Light Shows
Party In The USAMiley CyrusMagical Light Shows
ROCK In The USAJohn MellencampMagical Light Shows

Halloween 2022

This show was always a 1-hour loop with songs from the following list, generally only a few changes from one night to the next.

SongArtistSequencer
– Various BumpersShowtime Bumpers
– Jeopardy IntermissionVisionary Light Shows
The Addams Family – Theme SongRGB Sequences
Blue MoonThe MarcelsVisionary Light Shows
Bring Me To LifeEvanescenceVivid Sequences
The Devil Went Down To GeorgiaThe Charlie Daniels BandxTreme Sequences
The Devil Went Down To GeorgiaNickelbackVisionary Light Shows
Disney VillainsMagical Light Shows
Du HastRammsteinPixel Pro Displays
Enter SandmanMetallicaMagical Light Shows
Evil Lives Here IntroPixel Sequence Pros
Friend Like MeRobin Williams and Will Smith MashupVisionary Light Shows
Ghost Busters – IntroPixel Pro Displays
Ghost BustersRay Parker Jr.Pixel Pro Displays
Haunted HeartChristina AguileraPixel Pro Displays
I Put A Spell On YouHocus PocusRGB Sequences
It’s Halloween-lo-weenDisneyVisionary Light Shows
Mad World2WEI, Tommee Profitt & FleurieFairy Pixel Dust
Master of PuppetsMetallicaVisionary Light Shows
Michael Jackson MixMichael JacksonMagical Light Shows
MonsterSkilletPixel Perfect Sequences
Monster MashBobby “Boris” PickettxTreme Sequences
Monster MashBobby “Boris” PickettVisionary Light Shows
My Songs Know What You Did In The DarkFall Out BoyVisionary Light Shows
Purple People EaterSheb WooleyPixel Pro Displays
Skeleton SamLVCRFTBF Light Shows
Separate WaysStranger ThingsVivid Sequences
Smells Like Teen SpiritNirvanaMagical Light Shows
Smooth CriminalAlien Ant FarmRGB Sequences
Somebody’s Watching MeRockwellPixel Pro Displays
This is HalloweenThe Nightmare Before ChristmasMagical Light Shows
ThrillerMichael JacksonxTreme Sequences
Where Evil GrowsThe Poppy FamilyPixel Pro Displays
We Don’t Talk About BrunoEncantoRGB Sequences
Witch DoctorAlvin and the ChipmunksRGB Sequences
Young Blood5 Seconds Of SummerVisionary Light Shows
ZombieBad WolvesPixel Pro Displays

Here, Have a Model

I have put time into improving models for some vendor props. If those improvements would help you, have at…

Of course, I cannot give you any rights to the model that I used as a basis for my additions / improvements, because that intellectual property isn’t mine to give. However, you may use my additions and improvements in any way you wish, without attribution. Even if, or especially if, you are the vendor — I wouldn’t mind at all if vendors took the changes for incorporation in the official download models.

Arches

These are 5-layer, 100 node per strand arches, with the connections all at the same end (no zigzag wiring). They came about because I put strip in PEX tube and lost access to the far end and want to run them on long range receivers from one end without long extensions.

Custom Christmas Creations

They have some neat props, but I had to put a lot of work into them to make them look good while singing. Generally, select “state as outline” for the singers. These NMBC ones have both Halloween and Christmas color choices.

Boscoyo

Presents

The Chroma Presents (3D variant) did not have consistent submodels, and some of the wiring was not great… more jumps than needed or multiple links between the top and the base. These do not follow the vendor wiring!

Singing Pumpkins / Bulbs

I touched up the 4 singing pumpkins a bit… more submodels, and color applied to singing faces.

Not sure I would recommend this wiring for the 30″ upright singing bulbs, as I think they have a new one that doesn’t need long jumps. But:

Wreaths

The PPD Wreath / GeoWreath needed more submodels.

I added a Boscoyo Star Wreath on the door because it is in so many PPD sequences and there wasn’t anything else on the door.

Flakes

Diamondtip Flakes; these benefitted greatly from submodels and groups.

Small Flakes – I own these but haven’t populated or modeled them yet.

Tombstones

Small ChromaStones didn’t seem to line up with the numbers / images on the website. I’ve numbered mine according to the website image.

I also have a tomb stone with 2 layers and matrix from Boscoyo; it needed a lot of submodels and groups.

Spiders

Generally, the spiders needed submodels and groups, nothing more.

Pixel Arches

The fancy pants arches with designs inside the arch are nifty, but they need submodels and groups for sequences, especially ones designed for similar arches that have submodels and groups already.

Cats and Ghosts

Be sure to flip the model data on these if you have left vs right wiring. They look better if one of a the pair is flipped. Models below are “left”, as in whatever I thought looked better on the left.

Gilbert Engineering

Crosses

Adding submodels and groups to these made sense.

Flakes

Snowflakes

Zombie Flakes came with some of the worst models I have ever received, including a corrupt pixel numbering for one of them. Tried to make something useful out of them

High Density

  • Aztec – This was originally corrupt – pixels shifted by 1… benefitted from a lot of submodels and groups as it is not a popular prop and needs work to incorporate into existing sequences…
  • Baby Grand Illusion – Added / gathered submodels for this, which is not as well-loved as its larger model. Switched from subbuffer spokes cleaned it up a lot.
  • BOAW – Baby of All Wreaths
  • Dazzler – Added a lot of submodels and groups to make it do interesting things in sequences designed for PPD wreath, etc
  • Dragonfly – Needed a lot of submodels and groups to make it useful in sequences designed for other HD props
  • MOAW – This is as a custom model, not a circle model (for changing the strings more easily)
  • Reel Deal / Reel Max – Added submodels
  • Rosa Grande – Added a lot of submodels and groups to make it work like RosaWreath… but so much more could be done here
  • Rosa Wreath – Collected numerous vendor’s custom models into one here
  • Spin Reel Max – Added submodels and groups
  • Square Peg – Added submodels to increase versatility
  • Star Gazer – This came with very little useful in terms of submodels and groups for existing sequences, so I added some
  • Steampunk Spinner – This had a submodel off by a pixel and so one little circle was out of sync with the rest… one of those things that the audience didn’t notice but bothered me a lot.

Miscellaneous

Singers

Generic to singing props, there are reasons to have an outline submodel, a submodel without the face (for including in whole house or all display), the desire to fix the color scheme, or for complicated props, to have a state definition to use as an outline. Another important thing to do is name the default singing face definition so that it is first alphabetically, otherwise nuisances in sequence import do arise.

  • Decorated Singing Tree – minor additions to submodels and singing faces
  • Franken Monster – very minor changes
  • Grumpy Tree – I loved making faces for this that range from a as normal as possible to a lot grumpy
  • Mega Skull – Needed very little, but set up for whole house group
  • Nut Kracka – Needed very little, but set up for singing state and incorporation in whole house group
  • Quartet – Fixed some issues with spokes submodels
  • Singing Pixel 32 – This model came from the vendor corrupted, guess there’s not a lot of love for singing pixel props. In fact, mine got retired after year 1, nobody knew what it was… best guess was singing asparagus.
  • Singing Pixel 47 – Set colors
  • Spooky Tree C – Few submodels added, mouth adjustments
  • Triune – May not have changed, I forget
  • Upright Singing Bulb – The only change here that matters is that the “O” mouth was off by a pixel

Spiders & Webs

  • Preying Spider 150 – Needed some submodels/groups for consistency with other spiders
  • Preying Spider 350 – Needed some submodels/groups for consistency with other spiders
  • Mini Spider – Needed submodels and groups
  • Corner Web – Add consistent spokes, fill, spinner stuff
  • Half Web – Add consistent spokes, fill, spinner stuff
  • MOA Web – Add consistent spokes, fill, spinner stuff

Tombs

All received a few submodels and groups.

Insane

Added numerous submodels to these. Be aware that the insane cane should have the model data flipped to make a “right” cane. You may or may not want to do this to the Insane Pole… instead you might just pick the reverse submodels which follow the original wiring.

EFL

The EFlake46 needed additional submodels, and some existing submodels accidentally had backlight pixels where they meant others.

The EFL BabyBack similarly needed work.

The Showstopper Snowflake didn’t need much, got some groups, and I think I collected some submodels from other places.

Wings

Some wings got work done. Expect more soon.

Other

Chill is from the Professional Triers, several companies will cut you one out of coro, but it came with hardly any submodels and groups. It’s sort of a 1-off prop, can work as a singer, a snowflake, and I have it mounted up high so sometimes treat it as a bow, cross, or star. The submodels and groups are therefore a work in progress, but what I’m offering you is a lot better than what I got from the vendor.

I got a 270-node star and it quickly became a custom model, eventually added a lot of submodels.

I drilled a lot of extra holes in a HolidayCoro Tune To sign, so that it has full pixel matrix capability. This resulted in a custom model, but it won’t fit yours unless you drill and wire it like mine.

Things Worth Adding

Note for myself – add cube or other submodel generators.

Utility For Getting More Out Of 3D and Handling Multiple Holidays on One Layout

Issues

One of the most powerful elements in my 2021 Christmas show was whole-display effects. Patterns that wave across the entire layout in different directions in 3D are very engaging, especially in a display like ours where you can get up very close to the lights. Left/right and up/down are quite doable in 2D, but forward and backward in and out of the display need a different 3D camera angle.

In 2021, I only had one song with good 3D effects. Setting the camera angle on each effect takes time, but I was in such a hurry in 2021 and didn’t have much of it. I resolved to make better use of 3D for 2022. But, in the meantime, 3D had shown a significant drawback.

Because my house, like many, has a rectangular foundation shape, and a driveway, sidewalk, and fence that are squared against the street, the 3D view has a lot of stuff that shares the same X coordinate. With the default camera angle, this leads to a lot of effect renders that create streaks that are all the same color from front to back. See the video below, where the streaks are particularly pronounced on the side wall from 0:16-0:28 and again from 1:10 to 1:22.

Must Be Santa – Bob Dylan – Pixel Pro Displays

So, I was faced with a conundrum: Live with the streaks, drop down to 2D and lose the ability to do 3D effects, or do a lot of camera angle tweaking. (UPDATE: xLights will be getting default cameras per group. This should help a lot.)

Another thing that happened was that early in 2022 we decided I wanted to do a Halloween show. I had a lot of time invested in the 2021 Christmas layout, and a lot would be common, but I also didn’t want to delete a lot of stuff that would be used for Christmas 2022. I asked a few people with more experience than I have, and they all said to just make two directories and live with it.

I decided instead to make a script that would solve the 3D problem by rotating the layout so that the 2D camera result was nicer, and to also prune out props that didn’t fit the holiday.

3D Rotation

I applied a 3D transformation to my layout to rotate it 30 degrees around the Y axis. For comparison, here is the preview render of the same song with the rotation applied, which I feel to be marvelously better:

Same sequence, but layout rotated 30 degrees around Y…

Now, I am not mathematically inclined enough to work on the layout in its rotated form. Nor did I manually move and rotate everything… That was done by a python script:

python pyLayout.py
 --layout=c:\2021\xlights_rgbeffects.xml
 --outlayout=c:\2021x\xlights_rgbeffects.xml
 --transform=roty:30

This script can do a few other coordinate transformations also: translate / shift the coordinates by adding an offset, or rotate around the other axes.

This is largely self-explanatory, but here are some other things to note:

  • Rotation around X sounded like a good idea at first, but caused icicles to point upwards sometimes. I did not continue to rotate on Z or X.
  • You do not need to render your sequences all on the same layout. As long as the channel map is the same, which it will be if all you do is rotate the layout, the fseq can be used in your original show directory.

Deleting Props and Inactivating Objects

To solve the case of multiple holidays on one layout, I wanted to delete props and inactivate some of the image objects in the layout. The script provides a way to delete items in one or more groups (or other selection criteria), so I made groups for Halloween- and Christmas-specific items, and then use the script to delete them out of the layout I use for rendering and show purposes:

python pyLayout.py
  --layout=c:\2022_Base\xlights_rgbeffects.xml
  --outlayout=c:\2022_Halloween\xlights_rgbeffects.xml
 "--edit=InGroup=OnlyForXmas:Delete:true;InGroup=OnlyForFuture:Delete:true;Obj=.*_Xmas:Active:false"

Notes:

  • Some arguments must be quoted if entered on the command line.
  • Deleting props from xlights_rgbeffects.xml in this way does cause it to be potentially inconsistent with xlights_newtorks.xml if there were controller connections assigned to the deleted models. This is not a big problem; if you open xLights to the transformed directory and click “Save” on the controller tab it will write a new one. What you don’t want to do is launch xSchedule before doing this, as xSchedule trusts the outdated xlights_networks.xml and sends the wrong channels to the wrong place.

Other Features

The script can also:

  • Set the dimming curves on models (selected by wildcard or group); while setting the gamma to 2.2 manually on the whole display group is possible, this is a good way to automate and not forget.
  • Set the appearance on images (maybe to darken them for nicer preview videos)

Putting It All Together

My final command for Halloween 2022 was:

python LayoutUtils/pyLayout.py
   --layout=c:\users\chuck\documents\xlightsShows\2022_Base\xlights_rgbeffects.xml
   --outlayout=c:\users\chuck\documents\xlightsShows\2022_Halloween\xlights_rgbeffects.xml
  "--edit=InGroup=OnlyForXmas:Delete:true;InGroup=OnlyForFuture:Delete:true"
  "--edit=Type=Obj:Brighten:30;Obj=.*_Xmas:Active:false"
  "--edit=Model=.*:dimcurveall:0,2.3;Model=TreeFence:dimcurvergb:-14,2.5,0,2.5,0,2.5"
  "--edit=Model=MainMatrix:dimcurveall:-60,2.5;Model=Arch Hedge.*:dimcurveall:-60,2.3"
   --transform=translate:0,0,-300;roty:30

By line:

  • Sets the input layout
  • Sets the output layout
  • Deletes models from the “OnlyForXmas” and “OnlyForFuture” group
  • Dims down the 3D objects that make up the house and yard
  • Sets dimming curve on all models to a gamma of 2.3, and sets the red down a bit on a 5V tree.
  • Sets the brightness down on the main matrix and large arches.
  • Translates and rotates the whole layout in 3D space

Good Luck

You can feel free to use my script, of course. There is a bit of command-line help in it, but if it gives you any trouble you can reach me by email any address on my domain, or often at AusChristmasLighting.

Regarding the HinksPix PRO – 2022 Edition

Update Fall 2025: This post is almost entirely obsolete, yet seems to get more traffic than any of my other posts. For a generic overview of the controllers in my show and what I like about them, see my “New For 2025” post. I have switched to HinksPix PRO 80 (v3) boards, which are a worthy upgrade to get more out of your enclosures with minimal hardware adjustment. That said, the configuration advice for these boards still holds – just use the xLights “Upload Outputs” feature…

Update Early 2023: Auto update of firmware now uses a much more recent version, including all the fixes mentioned below. Those parts of the blog mentioning pre-117 firmware should be less relevant in 2023, unless you haven’t updated your firmware in 2023.

I started my pixels / xLights journey in late September of 2021. The HinksPix PRO was one of the few pixel controllers I could obtain late in the season, and it was available “ready to run”. As I was a newbie in a hurry, this sounded perfect for my needs. Since then, I’ve encountered several other people who bought HinksPix controllers for similar reasons.

Fortunately, the HinksPix PRO turned out to be a good choice. It is built well, and while it has a few quirks, so do all the rest. I have now obtained and run a few other kinds of controllers, so I do have some comparison points (see below). If I needed another controller in a hurry, I would certainly consider buying more.

That said, there are a few tricks to get the most out of these controllers with the least effort. Here are a few survival tips from a guy who runs over 80,000 pixels with them.

Ignore the Official Configuration Advice

HolidayCoro has an extensive collection of videos about the HinksPix PRO. If you are going to be an xLights user, ignore them! The controller’s designers envisioned a world where the controller was the center of the world, so it has design tabs in the web UI, etc. But, aside from the troubleshooting videos, everything in there is much more complicated than it needs to be. Just add the controller to xLights, attach props with the visualizer, and upload the configuration. Magic, all the hard work is done for you.

The absolute worst is the configuration of any smart receivers. If you watch their videos and try it, it will seem horribly frustrating. Fear not, it will all be clear and simple if you just watch this video instead:

If you don’t watch this video, at least do set your controller on “Universe Per String” to avoid serious troubles with the 16-port smart receivers…

Update The Firmware!

The HinksPix PRO was redesigned for 2022 to use a different main CPU chip; the new chip clocks at a higher frequency and required firmware changes. Due to time pressure (and heart surgery), firmware validation was not complete at the time some of these boards shipped. This is not a trivial matter, if you have a HinksPix you will need to update your firmware or bad things are likely to happen:

  • Firmware pre 114, new #929 and old #925 boards: Upload of the input mapping from some newer versions of xLights does not work. This is a showstopper.
  • Firmware pre 113, new #929 boards: Smart receivers do not get configured. This is a showstopper if you have smart receivers.
  • Firmware pre 117, new #929 boards: DMX signal timing is incorrect, and does not work with all DMX devices. This can be a showstopper if you have any DMX pars or the like.
  • Firmware pre 117, all boards: DMX channels are off by one in DDP mode. This may not matter, as few use DDP.

To update the firmware:

  • Get the image from http://joehinkle.com/firmware/.
  • Unzip the file onto an SD card.
  • Put the SD card into the controller.
  • Reset controller and wait for it to do its thing. This will erase the SD card, so if you have more than one controller you will need to put the files on the SD card again.

Update February 2023: No longer true. Do not update firmware over the internet because:

  • At time of writing, the internet server is not serving the latest firmware, but firmware with severe bugs as listed above.
  • After updating over internet, the controllers tend to hang on the firmware check step, which is a nuisance to clear up.


Other Advice

If you have a 32- or 48-port configuration, get an inspection mirror. On the plus side, HinksPix configurations have a lot of ports in a compact form factor. The downside? Some of the fuses are tucked in under another board, so if you want to see them easily you would want a mirror. If you have concerns about a prop you just built, do yourself a favor and test it on a port that is wired to the top board…

If you want to use long range differential boards from other vendors, see my post about mounting connectors on the enclosure and fixing the pinout at the same time.

If you have the smart receivers, the signal drivers in those are not as strong as the main controller ports… keep some data amplifiers handy…

Controller Comparison

Comparing controllers to each other is a dangerous business, almost certain to hurt someone’s feelings. But I don’t have feelings. If you don’t like what I said about your favorite controller, maybe they should improve that controller.

HinksPix PRO

Pros:

  • Great ready-to-run configurations, lots of pixels and ports
  • Good availability, good support, even in the busy season
  • Easy to use
  • Flexible configurations with 0, 16, 32, or 48 pixel ports and 0, 4, 8, or 12 long range
  • Built-in 2-port network switch so you can daisy chain without additional hardware

Cons:

  • Long range ports not on enclosure, and pinout not compatible with the rest
  • Slow to boot and reconfigure
  • Less popular in the community
  • Hard to change fuses on the bottom board

Falcon (F16v4)

Pros:

  • Community favorite
  • Easy to use
  • Supports lots of pixels and reasonably flexible expansion configurations
  • Nifty jumpers to support LoR and DMX pinouts for serial port

Cons:

  • Hard to obtain, never in stock and sell out quickly
  • Ready-to-run configuration should have more power supplies in it (350W for 16 ports is quite skimpy), needs a better network connector (and one for the second network port), and it would be nice to have the differential ports on the enclosure. Augmented the “paint pen” port labels with numbered zip ties,

WB1616

Pros:

  • Inexpensive given the port count (16+4 long range)
  • Good availability
  • Easy to use, quick to configure
  • Tight form factor makes it possible to drop into a wide variety of enclosures
  • At the price and size, really makes one question the merits of 16-port smart receivers

Cons:

  • Not available ready to run
  • No second network port
  • No expansion (just go get another controller)

Kulp K16A-B, K32A-B

Pros:

  • Easy to use, quick to configure
  • Supports reasonable pixel and port counts
  • Not expandable, but available in sufficiently varied configurations
  • Good availability for most board configurations

Cons:

  • Not available ready to run
  • Weak data signal drivers make it sometimes necessary to put data amps right on the controller ports
  • No second network port

Kulp K40D-PB

This is long-range differential controller only. I put this controller inside a Priemium Cube setup, with 1 port going to receivers in each of 2 small cubes, and 2 ports going to double receivers in each of two large cubes. Ran them just fine. At only 10 jacks, it has a few less ports than the competitive F48 or long-range only Hinks, but it is available, quite compact and inexpensive, and definitely worth considering on those grounds.

Experience Lights Pi Hats

These are great for inputs. The two output strings seem to work fine, but a configuration with two output strings is hard to take seriously given the price of a Pi these days.

AlphaPix Flex

I use one of these that came ready to run a megatree. It does the job, but doesn’t clear the pixels when not receiving data and doesn’t support smart receivers or as many pixels per port as the HinksPix PRO, so my opinion is that the Hinks is worth the extra few dollars over the AlphaPix.

HolidayCoro “Dumb” Long-Range Receiver Compatibility with Other “Dumb” Differential Receivers

It is sometimes convenient to send the pixel data stream over a CAT5 cable between the controller and the lights. This is for cases where you’d have to send a lot of pixel connections (e.g., xConnect) with power and data together an inconvenient distance, but where there is not enough data to warrant the expense and complexity of another controller capable of translating ethernet packets into pixel protocols.

The Basic Concept

It is typical to send 4 “streams” of pixel data over the Cat5 cable, to have 4 “ports”, however you like to call it. This is simply because the Cat5 cable has 4 differential pairs, each capable of transmitting a pixel stream. The signal timing on the Cat5 is exactly the same as the signal data that goes into the pixels, it’s just a “differential signal“, which is a well-known solution for increasing the range and noise-resistance of a digital signal, and with electrical isolation between the sender and receiver (no need for a common ground).

Kinds of Differential/Long-Range Receivers

Since the differential encoding scheme is such a straightforward application of common concepts and components, one might hope that differential receivers would be compatible. This isn’t as true as we’d like it to be.

The first thing to get out of the way is so-called “smart receivers”, such as the Falcon SmartReceiver or the HolidayCoro SMART Long Range Receiver. These smart receivers use the basic concept of the dumb one, but there is some “metadata” in the pixel stream that describes how to divvy up the data between receivers, allowing them to each send part of the overall stream to their connected pixels. This kind of receiver tends to have inconvenient limitations on number of pixels you can use, and to have a confusing compatibility matrix even if you stay on brand. So we are not considering cross-brand compatibility of smart receivers here… just the “dumb” kind (which are plenty smart IMO).

I use a lot of HinksPix Pro controllers in my show. Benefits of the HinksPix Pro: I could get them. I could get them easily in October 2021 when I started putting my first show together, they came ready-to-run, they are built well, easy to use, and have a lot of conveniences like fuse indicators, bulkhead connectors for the 2 ethernet ports, and so on. The one down-side I noted is that there are not bulkhead connections for the long-range ports, just a strain relief for the cables, but we’ll get to that in a bit.

I’ve also found a lot of cool differential receivers on the market besides the official ones and their ready-to-run packages. My favorite has to be the Wizard of Wire Original Meanwell Differential Receiver for Falcon and Kulp controllers, because it makes it easy to assemble a compact differential receiver like the one on the right (next to the HolidayCoro board on the left for comparison):

But… are they compatible?

Are They Compatible?

According to the manufacturer, “they are not compatible”, end of story. (This may be a good time to say, as a disclaimer, I am only telling you what I did, what worked for me. I am not responsible if you break your stuff! And since the manufacturer said they are not compatible, if you break it, they will probably be happy to sell you another one and be no more helpful than that.)

But how silly is that? How could they not be compatible given the simple mechanism and principle of operation?

Well… the fact is they’re not compatible. Not quite. I plugged them in and tried it, and it almost worked. Port 1 and 4 worked, port 2 and 3 had weird behavior where lighting up pixels on one of them lit up pixels on the other and vice versa… and so they’re off by a pin. Todd Merkel got back to me with his pinout right away:

  • Output 1 – pins 1/2 (typically orange pair)
  • Output 2 – pins 3/6 (green)
  • Output 3 – pins 4/5 (blue)
  • Output 4 – pins 7/8 (brown)

This is quite typical of how a Cat5 cable is used.

The HolidayCoro-supplied controller and receiver have the following instead:

  • Output 1 – pins 1/2 (Orange)
  • Output 2 – pins 3/4 (Blue+GreenWhite)
  • Output 3 – pins 5/6 (Green+BlueWhite)
  • Output 4 – pins 7/8 (Brown)

(HolidayCoro did not / would not tell me this. You could perhaps glean a first approximation of my method from the following photo.)

Confirming the hunch that solid green and blue are swapped… somewhat thoroughly.

Now, aside from being a nuisance, and as Skymaster from AusChristmasLighting pointed out to me, this pinout is not ideal because Cat5 cable gets some of its noise tolerance characteristics from how the wire pairs are twisted together, and you’d want to send both polarities of the signal down the same twisted pair, which the latter pinout does not.

Making Them Compatible

So now we know how the pinouts differ, and which pinout is “right” and which is “wrong”. For compatibility and best performance, we’re looking for a way to use the Falcon/Kulp/Todd pinout. Even if two HolidayCoro products are talking to each other, it’s an improvement, albeit a pain in the butt, to swap the solid green and solid blue as soon as they come out of an HC long range port, or as soon as they head into one.

One way to do this, the first that came to mind, was to cut the RJ45 connector off the Cat5 cable and crimp on another with the wires moved a bit.

It’s not as ideal as it says…

I do very much love how vendors and people in the chat rooms referred to this as a “custom” cable, rather than a “buggered” cable. Realistically, I am not likely able to remember which end of which cable has been customized/buggered, or to remember which is suitable for ethernet use vs. long range differential. So something else then.

Remember how I said I wished there were jacks for the long-range connections on the outside of the controller box, but there weren’t? Well, adding the bulkhead connectors provides the ideal place to swap the blue/green conductors and make things compatible.

Just fix it between the offending controller/receiver and the outside of the box…

And, no need even to recrimp the RJ45 connector, as there’s a junction between the male cable and the board with the female connection. We’re going to swap the pins at this junction.

Step 1

Find the junction between the male cable and the board that mounts to the housing and the female connector…

Step 2

Cut zip tie, and disconnect…

Step 3

Gently lift the plastic tab securing the green wire into the connector and slide the green wire out.

Step 4

Repeat for the blue wire…

Step 5

Swap and reinsert the green and blue wires (now the blues and greens are next to each other)…

Step 6

Plug connection together again… add a zip tie to hold. (And — disregard the picture — you should trim off the zip tie end.)

Conclusion

After making these modifications, I can now quickly plug either of the long-range receivers into the HinksPix controller, using a standard Cat5 cable. I tried all the ports, and everything works as expected.

I love it when stuff works…

Now all I have to do is customize and/or install about 80 long range ports (controller and receiver side)… but I guess I needed small tasks for coffee breaks, right?

Using Tree Model for a Cylindrical Matrix

I have a matrix net wrapped in a cylindrical shape, vertical axis. It is, in fact, wrapped around a tree. The xLights “tree” model accommodates cones, cylinders, flat spinner discs, and anything in between.

Cylindrical Tree Matrix; 8′ horizontal (circumference), 12′ vertical, 3″ net spacing

Ought to be a perfect fit, right? Well, there is one slight problem. In xLights (as of 2022.11), the wiring of all tree models is vertical, up and down, and this case I wired it horizontally, around the circumference of the tree.

At the end of 2021, I was in too much of a hurry to do anything about this. Simply put the matrix in as flat, rather than round, and a lot of the effects worked fine, hardly noticed that it did not handle 3D “all yard” effects quite right.

Flat in xLights

For 2022, I’m revisiting this. The easy thing to do seems to be to add a horizontal wiring option to the existing tree model. The tree model in xLights is just a matrix model, with the points moved around in 3D space. So, it is a fairly easy change, which I has now been included in xLights.

Horizontal Tree Wiring works…

5 Layer PEX Arch

Arches are quite common. The reason I’m bothering to write about mine is because of how I got it to work in xLights, which was a bit tougher than expected. The build pictures are, therefore, mostly for context, though I guess you could use my 3D printed clips, too, if you want.

Physically Building the Arches

For the hedge area in my display, I wanted some fair-sized, multi-layer arches.

6 large-ish arches across the hedge, xLights layout screen

There are a lot of popular techniques for making arches. Some put bullet nodes in plain sight in an arch pattern, others use pipe or tube in various ways. I prefer the diffused look of 3/4″ white PEX tube with LED strip inserted.

Mini arches made of white PEX with 2m LED strips inside

I tried a variety of pipe options from the home improvement store. 1″ PEX was easier to slide the LED strip through, but it wasn’t as bright and was a bit less cooperative when bending. PEX-A has a slight orangish caste to it in the daytime, didn’t look quite as nice in the dark either, so I went with 3/4″ white Sharkbite PEX-B.

The arches were basically sized with 5m LED strips in mind; I used 60/20 RGB strip, which has 300 LEDs in 100 sections that can be controlled. Slipping these 5m strips into the PEX tube is not that easy. The method is simple… slip a fish tape through the PEX, cut the female end of the LED strip down a bit, leaving a stub to attach the fish tape, pull the strip through. Then, cap the ends (in my case, I used a bit of hot glue with some wadded up coro to help it bridge the end.

Fish Tape and Strip

In reality, this is straightforward on a 2m mini-arch, but not delightfully easy on a 5+ meter piece of PEX. We used 3 people, one to pull the fish tape, one to guide the LED strip into the far end, and one in the middle to help hold the PEX straight.

Mounting the arches for 2021 was a matter of optimism… and loads of zip ties. It was already December, early-approaching-mid-December, and I was in a hurry. I had garden/fence stakes hammered into the ground, planned to ziptie spare bits of pipe to those, and then zip tie the arch tubes to that, with some other bits of pipe ziptied along the way to maintain clean spacing. It was time consuming, and a bit sloppy.

Arches were a bit sloppy / slouchy

Lit up, they were OK, I guess. (One thing I did when they were lit up was sharpie an index mark on the tube at the middle of the LED strip so I can get better alignment next year.)

A bit better in the dark, but still want a cleaner install…
Storage was going to be a bit of a mess, also.

I decided for 2022, I want a much cleaner, easier, setup with less of the work done in the field. The overall plan was to build a frame of aluminum channel, radiating outward from the center, and clip the tubes to that. I designed 3D print clips to replace all the zipties.

Ignore the green – it’s an early prototype of whatever filament was already in the machine; “production” was clear PETG
To be screwed on the frame with 4-40 of course

There are two 3D print files for this:

Making the frame and attaching the clips went to plan. I used some PVC board I had lying around, and decided the frame would be best if it had quick-pull pins in it so it can be collapsed down for storage.

Frame folded down
Frame folded out, with the tubes clipped in… it is a bit much for the lab…
Lit up with a fire effect… Did look yellow in real life…

Controller Connections and xLights Modeling

Controller connection to the arch last year (2021) got a bit messy. This had to do with some limitations of xLights, the controllers, and the decision I made to nip off the female end of the strips and seal the end of the tube. Also, I was in quite a hurry as at this point it was mid-December.

Controller scheme

In my head, the arches were going to be connected to smart long range receivers, located close by the near ends of the arches. However, there were a couple of xLights limitations here:

  • The xLights arch model for layered arches has a wiring pattern that “zigzags” back and forth across the arch. This makes a lot of sense, except in my case where I cut the connectors off and the easiest place to start again is back at the controller side.
  • The xLights arch model only supports one controller connection, so configuring the strings was going to have to be done in the controller
Zigzag wiring pattern for layered arch in xLights

I was not able to figure out how to get the smart receivers configured to handle 5 ports splitting up the string of 500 nodes xLights assigned. It’s probably possible, but I couldn’t figure out how to do more than 4, and opted to assign the 500 nodes to a port on the main controller, then go spread the string out over the next 4 empty ports. Wires were run to the far end of the arch to make it behave like xLights. These were long enough runs to require data amplifiers, without which many of the tubes would “lock on white” after they pulled the ground voltage up too far to read the data signal, as Keith explains so clearly in this video.

The correct answer would have been to use a custom model. I know this, because I have one now, which can be found here. How you get the custom model is a topic of interest. You can export an arch model from xLights, add a few submodels, and it is suitable for use as a custom model; it’ll render like the arch for all the effects, and you can split up the controller connections however you like. The only hurdle is that it does still “zigzag” and that’s not what we want.

There are options to fix this:

  • Manually mess with the custom model to reverse the substring numbering for half the strands
  • Change the xLights source code to enable a non-zigzag wiring pattern.

Shockingly, I opted for the latter option. That code is here.

I plan to ask the xLights developers if they’d like to include it; I understand if they do not (as it is a very limited application, needs added to the manual, tests, etc.), but it was still fun to learn enough about xLights code to make it work. I’ll be fine either way, as I used that modified code to export my arch as a custom model, and it will import into any xLights just fine.

Anyway, I’m looking forward to the 2022 season, and an arch that is much easier to set up and wire, and where xLights will auto-upload the controller configuration. Gonna be a fun season, with that and so many other upgrades.

PixelTrim System in xLights

Summary

If you want a trim line to be embellished with something a bit fancier than a single light string or plain icicles, the HolidayCoro PixelTrim system is an interesting option. Start with an ~8′ plastic strip that holds either 12mm pixels or C9 brilliant bulbs, attach (using zip ties or Pivot Connector Buttons) motifs to the strip, and pop in some pixels. Zip tie to a pipe and clip to the house for easy installation and removal, or mount any other way you’d like.

Thanks to the thoughtful design and high quality of the product, this is mechanically a very simple build. But, if you want to really get the most out of it in xLights, you’ll really want a lot of submodels – one for the light string, one for each motif, maybe even one for each submodel in each motif. That last bit is probably the valuable part of this blog post… I did that with a python script and if you’re brave, you can try to use it to generate the submodels for your own personal PixelTrim configuration.

My Project

I have a driveway arch made out of conduit that was lit with AC props in 2020 and 2021.

Driveway arch in a static display in 2020, and then in 2021 when I switched to xLights, mostly pixels, with a few AC props on LoR.

Last year (2021) I started adding pixels. I expected to put all the old A/C stuff on LoR controllers and add pixels also. It was quite ambitious, and I didn’t get very far adding the AC stuff, and a lot of it blocked the view of the pixels.

My 2021 A/C props… a shell of their former glory…

So, what really happened is I didn’t have an inspiring A/C element, and the arch left a big hole in the middle of the display when the music was on:

There’s only one obvious thing to do here… add more pixels!

I decided to try out the PixelTrim system for this arch for 2022.

Mechanical Build

There will be 3 sections of PixelTrim, a vertical run on each side, and one horizontal across the top. (There will be props on the corners and hanging, but this will be revealed later… when I decide what they’ll be :-D) For this post, I’ll focus on one of the vertical runs.

Winter / Christmas PixelTrim Motifs

PixelTrim comes with a variety of motifs for winter/Christmas; I chose the two snowflakes. PixelTrim comes in white or black; I chose white. PixelTrim comes with holes for C9 Brilliant Bulbs or 12mm nodes; I chose both (and I reserve the right to zip tie a strip down the middle, too!).

I’m not sure they expected anyone to use both together with the motifs sticking out of the side… but that’s no reason not to do it!

Assembly is quite straightforward. I opted for the zip ties to make the connections rigid:

Zip tie the strips together and to the motifs.

Well, it was mostly straightforward. I did have to cheat and punch some holes so the bullets could pass through the motif stems.

The price of doing something unexpected, I guess.

Then I wired it up (the rest of the way). On the off chance you don’t have a preferred method for pushing pixels, I will say that I wore gloves, and pushed them into a 13mm socket to provide uniform support for the plastic sheet. After all the pixels were pushed in, I flipped the prop over and looked to make sure that each was snapped in properly; a few weren’t quite right but it was easy enough to wiggle them until they clicked all the way in.

All wired

Sequencing

It looks like the hard part is done, right? Now all we have to do is plug it in and it will light up, right? And it will. Just plug in the 24 C9 lights and that’s a nice string. Plug in the 491 other bullet pixels and… it will light up, and it would look pretty with a single strand effect on it too, but it won’t be amazing. With a prop with this much detail, we really ought to be able to get a mini-show on the strip itself.

What we really need is an xLights custom model. First, we start by making custom models for the mini flake motifs. You should probably make your own, as the wiring order matters, and I did wire them in from the sides. And I added submodels, and added the model and submodels to groups, as these are important steps for imports. Here are links to my custom models for reference:

Now, we could manually create a custom model for this, with a little cut and paste. And we could then make and group all the submodels. It could very well take an hour or two to do this, so, naturally, being a computer programmer by trade, I spent three or four hours writing a python script to do it for me.

It is a bit clunky, but you are free to reuse my python script. Just change the hardcoded strip length, direction, motif model files, number of pixels to the first and number between occurrences for each prop type, and run… it’ll make your composite model, all the submodels, and all the groups for you.

End Result

I ended up with the xLights custom model found here. To prove that it worked, I took the new “Mr. Santa” sequence from Pixel Pro Displays, and mapped as much of the sequence to the prop submodels as possible:

xLights Preview Video

I’m also very satisfied with the real-life version:

It runs! In the dark, with the gamma set properly, it might even look good.

Can’t wait to put it in the show next year, along with a lot more PixelTrim runs!