Well, I’ve done it. I’ve run a sequence at 100FPS. (And I’m pretty sure nobody will notice. Sometimes you just do … stuff. For … reasons.)
Last Year
Last year, I wasn’t happy with how the whole house effects looked; they just weren’t smooth. This point was driven home when we went to see the excellent Christmas on Runaway show (which is the nicest one for many miles, has a real megatree, moving heads, and all of that) and thought it seemed a good bit smoother than mine. So, I wasn’t really getting 40FPS, and also set my sights on getting clean 40FPS and 100FPS if possible.
Changes
When the show isn’t clean, there can be more than one problem… sequence issues, player issues, network issues, controller issues, pixel issues. Primarily, my problems were the player and the controllers.
xSchedule was letting me down. I had noticed it was better if I didn’t have remote desktop active, but still some days were better than others. And maybe there were issues with that laptop, too. Both got changed out, and the new stack reports the frame times and packet delivery more thoroughly. I’m glad I did this, as I have 2x as many channels this year, xSchedule certainly couldn’t have done it.
Controllers weren’t displaying all the frames. I ran a variety of lab tests to see what the controller capability really is. I was running some HinksPix PRO v1 and v2 boards, and those have somewhat tight limits on what they can do at 40FPS; swapping them to v3 boards allows 250 pixels per port at 100FPS. The BBB-based controllers do over 300 pixels/port at 100FPS, and the Baldrick 8s do 300 pixels/port at 100 FPS. Due to the 2021 chip shortage, I have only a very small number of Falcons (F16v4 and F48v4), but they do well over 100 pixels/port at 100FPS. The other controllers that I was using didn’t make the cut … weren’t able to display all frames at 40FPS, let alone 100. Those got kicked out of the show and are sitting in a small pile in the basement awaiting their fate… if new firmware won’t fix them, I’m tempted to put some K32Max or similar boards in them.
I had some pixel strings that were longer than those supported by their controllers, but not many. (In 2021, when I started, I had the mistaken impression that the pixels used .6W-.7W each and that I’d need one controller port per 100 pixels, so I’ve always run a lower number of pixels per port.) There were a few places where I had 1 port on a single 350-400 node prop, but I added plugs.
There are still some exceptions. My new P5 panel does not handle over 40FPS. I had to set the player software to deliver frames to it at most every 25ms. Likewise, I have set the controller that feeds the P5 tombs to 1 frame every 20ms, but they don’t show any real problems when hit with too many frames, so maybe that wasn’t necessary.
Conclusion?
I hope you get some amusement out of this endeavor… putting many hours into something nobody else notices or cares about is part of the pathology of the hobby :-).
Been a quiet year here at Merry on Cherry, without a whole lot of time for new things.
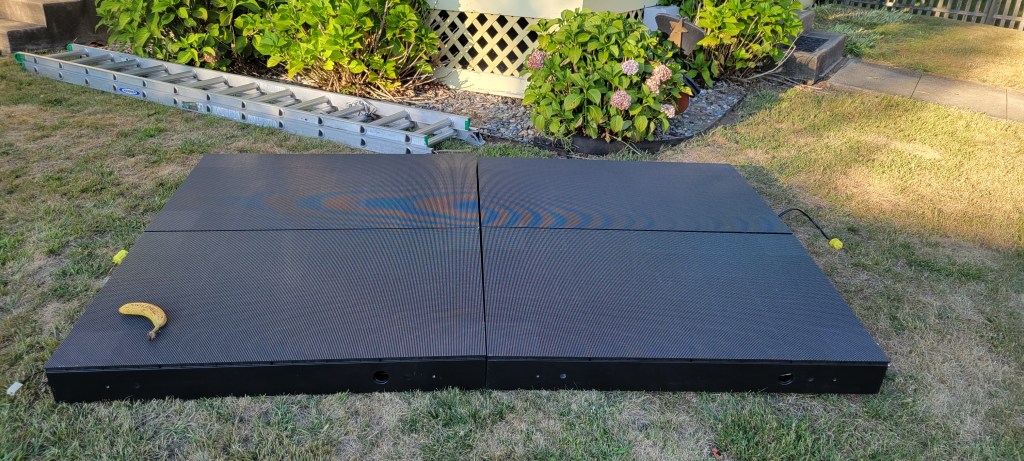
P5 Panel
The big addition for the year is a P5 panel to replace my pixel strip matrix. I got the custom prebuilt modules via Your Pixel Store. It’s 8×10 panels overall, so I thought having it made as 4 cabinets of 4×5 would make it easy enough to install myself.
This was incorrect, but fortunately Shay and Noah from SBL Painters came and helped me out of the jam.
Of course, each year also seems to require a misadventure. The panel worked in testing on Aug 31, and through the following weeks… but failed on 9/28. An industry veteran tells me this will be a faulty PSU (and even which one)… on Tuesday we’ll find out if he’s right (I’ll bet he is). (Tuesday update: because he was exactly right, I can say that this was Kent from ACL & KR Lights.)
Smoother Playback?
Every year I say I have perfected my controller fleet, and only to end up with a “do over”. (Last year, I got rid of all smart receivers and went to 1Gbps networking, thinking that would settle things for a few years. Nope.)
I’ve been thinking for a while that other people’s 40FPS looks cleaner than my 40FPS. So, I started an investigation and found more than one problem. Also, as I hardly ever go over 300 pixels / port, and can make adjustments to get below that, I am considering going to a higher frame rate to make the whole house effects a bit smoother.
Anyway, I broke out the high-speed camera (ok, fine, I just used slow-mo on my phone) to see if the controllers are doing what they should be doing. Not all of them were. Normally, I would ask vendors if they had any comments on the results before I shared them, however this time I think some would have said no, so I’ll just pull the punches a bit and only confirm the good results (where the board meets or exceeds the vendor’s specifications). If a popular vendor / controller design is not listed here, and you know I have those controllers, it probably flunked the tests… probably didn’t even do what it was supposed to do at 40FPS.
FPP-based BBB capes. These do very well, perfect 100FPS at a bit over 300 pixels per port, on 32 or more ports. Those can stay in the show, for sure.
Baldrick 8. The vendor does not rate these for 100FPS, just claims “750 pixels/port at 40FPS”. However, they do 300 pixels / port at 100FPS very well. (Close the web page or it will drop a frame every now and then.)
Falcon v4. The vendor says to ask support to set expectations about 100FPS, but I didn’t bother. They’ll do over 100 pixels / port, maybe 150 pixels / port at 100 FPS easily enough, so it meets their claims. They may do more pixels / port than that, there are quite a few advanced settings that might help here, but I didn’t inquire or try them.
HinksPix Pro v3. The vendor makes no claims at all about support for 100FPS, but it turns out that it works reasonably well… 250 pixels/port for 32 or 48 ports is fine (I don’t have a box with all 80 ports populated to test).
Anyway, those results led me to replace (or at least temporarily sideline) a few controllers. Not to worry, replacement 16- and 32-port BBB capes are ready for action now.
Playback Software
It’s finally time to ditch xSchedule. I lived with the quirks and bugs for the last 4 seasons, and it’s part of the reason my playback is not as smooth as everyone else’s. So, this year I’m switching to a new player… because nothing says “adventure” like a new pre-alpha player.
Coro Props?
Frankly, I’ve got most of the coros that I need, and I’m running out of display and storage space. However, I picked up a few replacement snowflakes to take over for the EFlake-450s. (There was nothing wrong with the EFlake design, but they had the misfortune of being pushed with 2022 pixels, and those were starting to fail. The x-flute coro just holds them too tightly for replacement to be worthwhile, so I got some new flakes from Boscoyo and GE.
I liked the way the P5 tombs turned out, so I got some stockings. Will put them up… somewhere…
To fill a small hole in the hedge, I grabbed a couple of these from the new line of coros from Wired Watts. They’re quite well made, a relative bargain at $11 each for full color printing with wiring diagram on the back.
The main thing I’ve been doing is picking up some patriotic coros, hopefully to be used for the 4th of July next year. (That Boscoyo eagle … I think it looks pretty good up there…) I got quite a few from Pixel to Prop (they have a good selection of stars and spinners in red, white, and blue), and a few from GE (USA letters, armed forces cutouts).
I do also have a waving snowman and a few other items from EFL… but what pixels will I use for that?
Best Pixels For Coro?
As I was last year, I’m on the hunt for better pixels for coro. I have lots of 12mm resistor bullet pixels, but am always looking for something more efficient, lighter weight, with a softer look. (And yes, more reliable than those 2022 pixels. A lot of the newer pixels are a single LED module made and soldered 100% automatically, which at least has the potential of being more reliable.)
GS8208 bullets (e.g. YPS Duo). These tick the box for higher efficiency, and they’re super bright. But they’re still bullets in terms of size and weight, and they have the high manufacturing complexity of a PCB with a main chip and several passives encased in epoxy. They have a mind of their own when powered with no data signal, which is also a bit weird. Keep to well under 100 from power. I use them when I want their sheer brightness, so some of the 4th of July stuff uses them.
WS2808 bullets (Wally‘s). These are also higher efficiency and run a couple hundred pixels from power. The brightness is about the same as resistor bullets. These are a significant efficiency upgrade from WS2811 resistor bullets, but they are a complex product with a lot of passives on the PCB, and are still the same size and weight as bullet pixels. I’ll be getting more for those cases where only bullet pixels will do.
Gumdrop (Wally’s Lumidot). These are much lighter than bullets and are also high efficiency. Much softer look. These do bleed through white coro (which can be good or bad, depending on what you’re going for), but the big issue is they fall out. They work great in ChromaTrim and a few other things (probably tree strip), but for general usage in 10mm coro, they’re not great. I really do like the look, so I’m getting some custom coros with undersized holes. We’ll see.
Gumdrop (MLS Magicolour). These are also light and efficient and have a gamma of only 2.0, but are not tall enough for 10mm coro… probably a great candidate for tree strips and HDPE matrix.
Gumdrop (EZRGB or ScottLED). These are nice and tall, do not bleed into coro much, and are efficient and lightweight. Somewhat dimmer than the rest, and only set for coro of 10mm thickness.
Gems / Blackouts (YPS or similar). These are very light and efficient, run 200+ from power, and fit well in 10mm coro. Cons: Unless you pay a little more for blackout, they bleed into the coro. Less viewing angle, and somewhat weird color mixing – tend to look a touch blue or orange depending on what side you look from. Great for high density.
There are a few other offerings I’m keen to try… but can’t get ahold of just yet. EVO Domes come to mind, but sadly, Mattos preorder schedules don’t line up with my show very well.
So, the best depends a lot on the situation. Seems like resistor-based bullet pixels still may have some life left… especially at the new lower prices this year from ScottLEDUSA.com.
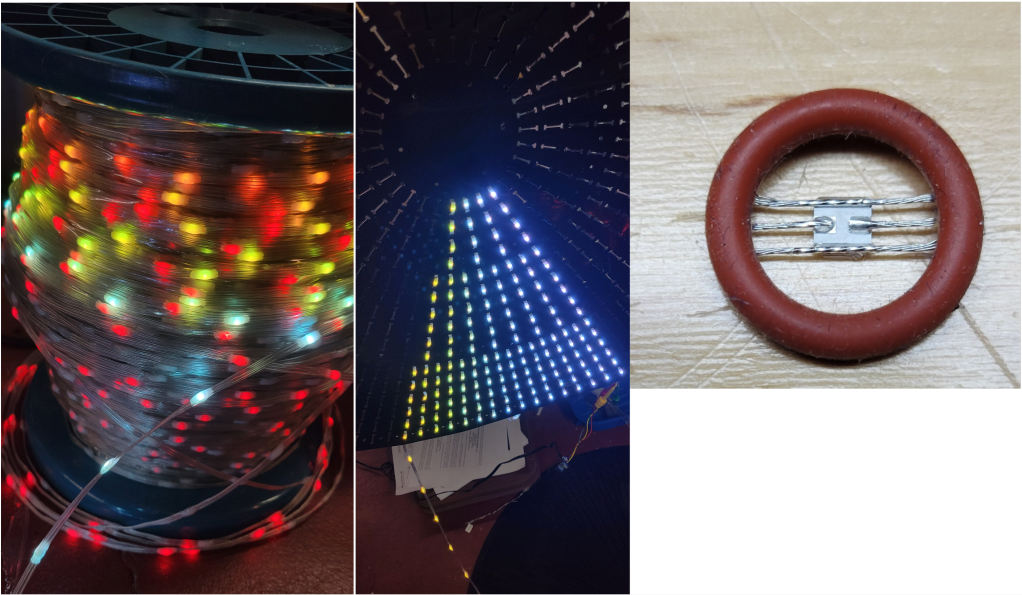
I think the coro bleed has the potential to look pretty cool … a bit softer. Gilbert Engineering was nice enough to custom cut some spiral trees with tighter holes for the lumidot pixels… see lumidot on the left, vs resistor bullet on the right. It worked out pretty well.
Seed Pixels?
I’m working on a seed pixel flag, intended as 40 strings of 250 2″ spaced seed pixels. The custom HDPEs have arrived from HolidayCoro, and they are amazingly clean-cut… now I just need to put the 10,000 pixels in.
Additional matrix and tree projects are ongoing… but they won’t make it for 2025. All of this is for 4th of July 2026 (hopefully).
3D Printing?
Still on the “to do” list is some sort of frame for last year’s seed pixel mini trees, to hold the cone into a more conical shape. Updates as warranted.
P4 Panels?
Last year, I got some flexible P4 panels, but never got them to work. Hoping the new PB2 panel cape from Kulp will be the ticket, since it has the ‘E Line’. We’ll see.
Sequences?
Yes, there will be new sequences. No spoilers! (Actually, I’d tell you, but I simply don’t know what they’ll be yet.) I will be using EZSequence for as much as possible this year, though I will probably resort to reimporting last year’s sequences again to keep sufficient variety.
Bitrex?
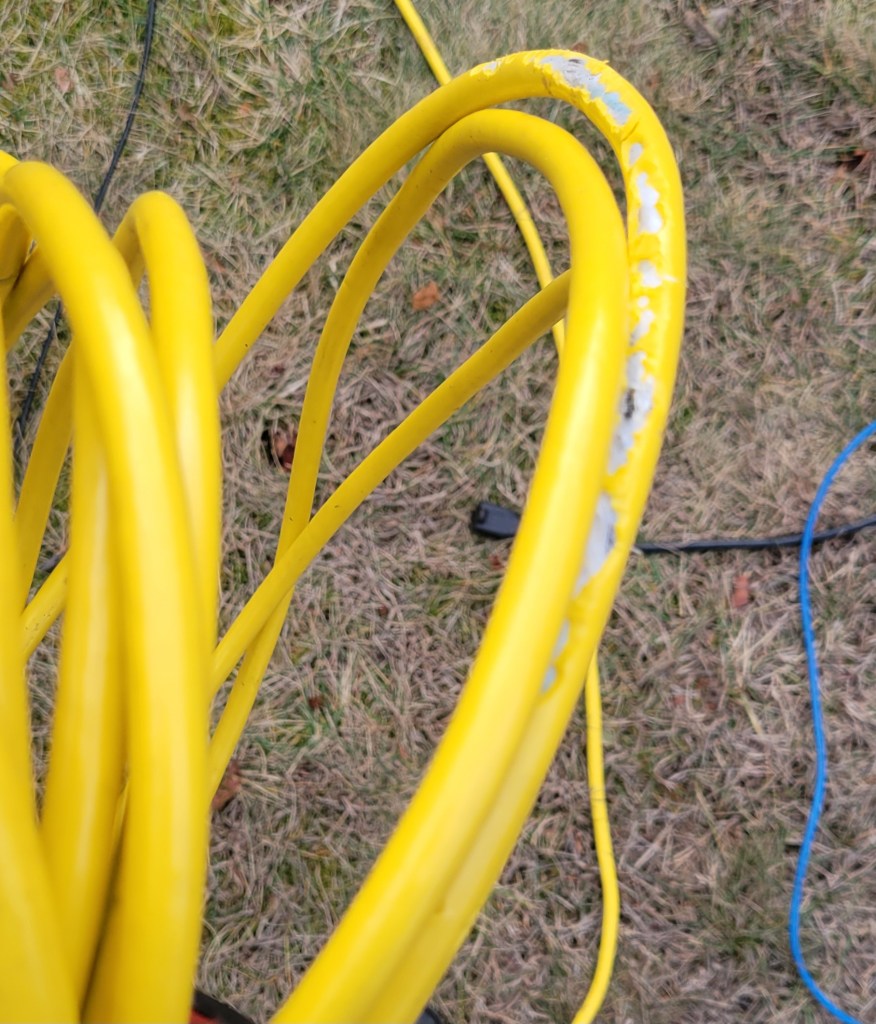
There seems to be a rabbit nexus under the hedge. They took nibbles out of each of my extension cords… the yellow ones, white ones, pink ones, green ones.
They only thing they didn’t bite, as near as I can tell, is the cheapest black ones. But enough about the past… this year I will spray them with something bitter and report back as to how it went.
My show is like a crummy commercial for vendors. Without the sequences from vendors and individuals, all I would have is a lifeless mess of tangled cables and plastic cardboard.
Christmas/December 2024
Generally, there is less Santa / Christmas music after Dec 25. Plenty of songs about snow, princesses/princes, and miscellaneous tunes. The Christmas stuff will probably be available via RemoteFalcon, however. Likewise, the non-Christmas stuff will probably be available by RemoteFalcon prior to the 25th.
This show is a 2-2.5 hour run (7p – 9/9:30p) without repeats (unless I make a mistake, or unless someone chooses a song on RemoteFalcon). There are generally only a few additions/removals, and a few rearrangements from one night to the next.
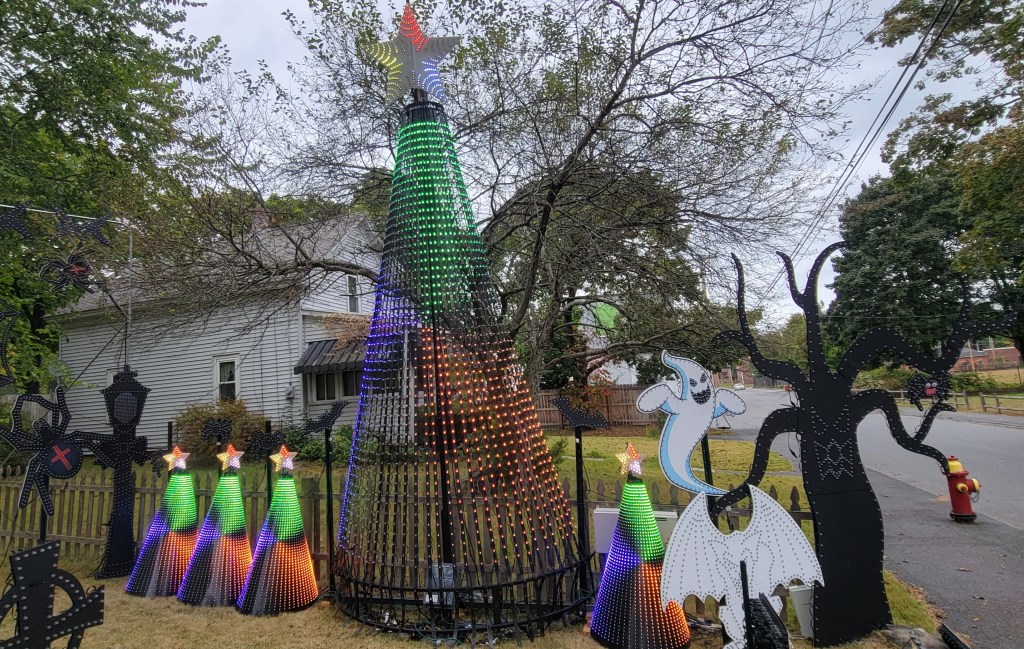
As I mentioned in other recent posts, I’m trying to diversify the look of my show a bit from bullet pixels in coro. As part of that effort, I decided to try my hand at a few custom designs for seed pixels in HDPE. Here you will find a few build / end result photos, as well as source code in case you want to have some cut for yourself or want to adjust the design.
Concept
The basic idea I started with is to cut ‘I’-shaped slits in the sheets of HDPE plastic and push the pixels in so that the HDPE holds them. Snapping the pixels in seems to work well.
The trick then is to come up with pleasing designs that accommodate the spacing of seed pixels without a lot of splicing or slack wire. I’m using 5cm spacing in these designs, which allows just under 1” spacing for going out along a path, then turning around and coming back in the alternate holes.
Pixel Choice
The first pixels I tried were incredibly cheap 5V seeds. These fit in the plastic just fine, but the wire was extremely thin and hard to work with, and a lot of PI points were needed. I spent far more time doing PI than designing the props and pushing pixels (though perhaps this is just because I am bad at PI).
Sure, the colors are warm and pretty, but the controller is asking for white.
Anyway, after the first prototypes, I switched to premade strings like these 12V 200-node strings from Wally’s Lights that work fine without PI. Utilizing 200-node strings without cutting became an additional design requirement.
HDPE Fabrication
As I mentioned last year, HolidayCoro offers completely custom HDPE cutting, with sheet dimensions of approximately 8’. All designs shown here were cut there. (If interested, your best bet is to email sales@holidaycoro.com or fill out their web form.) All other work was done manually. Pixels were pushed in using either the worn-down eraser of a #2 pencil, or one of the oval-shaped punch tools in this package. In cases where additional holes were needed, these leather punches were also used to make them. Some holes were also made and reinforced with a grommet press.
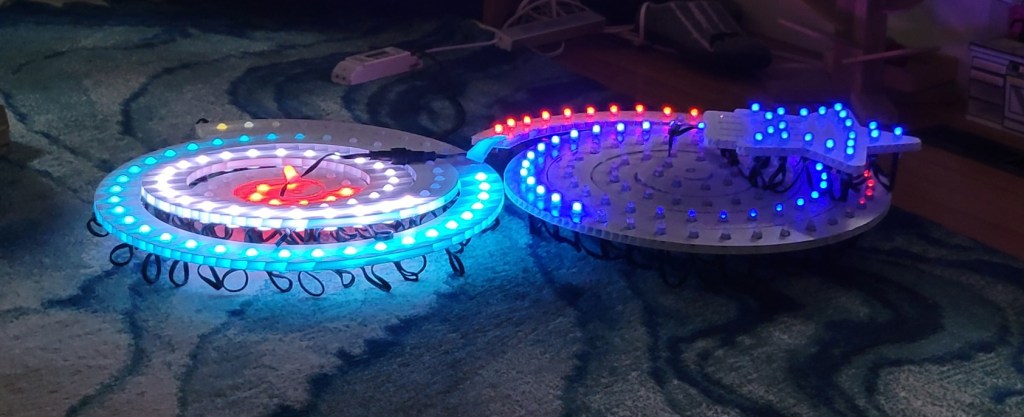
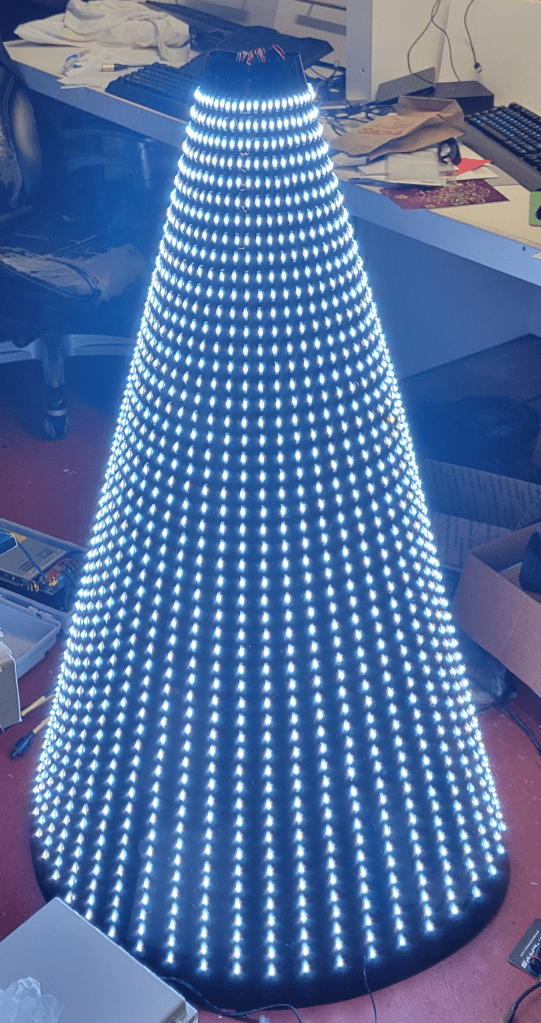
Mini Megatrees (1600 node at 240 degrees)
I have had HolidayCoro HDPE bullet pixel trees since my first show in 2021. The basic idea, an HDPE cone with pixels stuck in it, translates well to seed pixels:
As I do like my storyline sequences, which look good on trees with 16-32 strands of 50 pixels, I designed the “minimega tree” to be about 4’ tall, which leaves room for 50 pixels vertically. 50 pixels is also convenient to work with if you have premade strings of 200 pixels, at 4 strands per string. A full 360 degrees is 48 strands, though I have generally been populating 32 strands (240 degrees) and 8 ports.
The Monster Mash … doo doo doo….
From an xLights model perspective, using an “alternate nodes” configuration that starts at the top of the tree leads to almost perfect use of the 5cm spacing.
“Breathtaking. I shall call him… Mini-Me.”
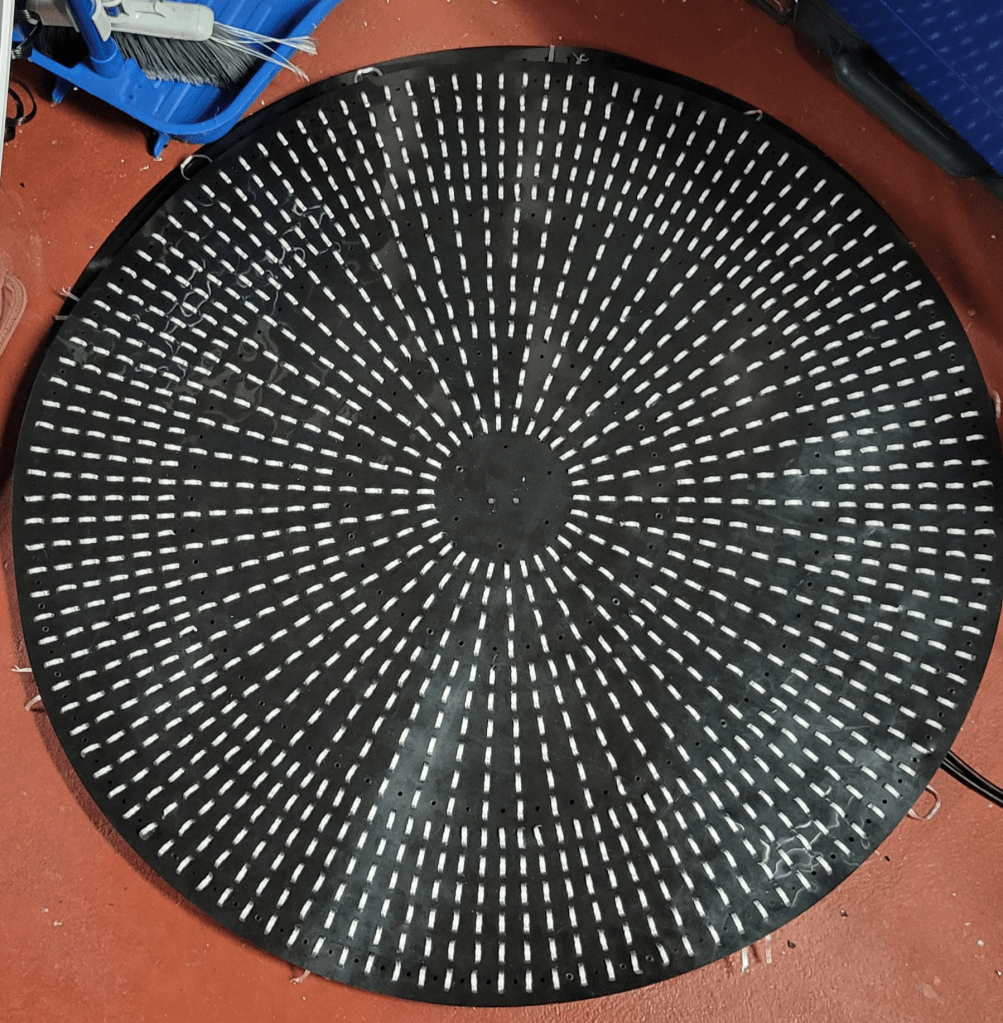
Spinner (1200 nodes)
As the tree design does not fill up the full sheet of HDPE plastic, I designed a spinner to go in the corners. Because I wanted it to support 5-point star/ and 6-point snowflake, I gave it a symmetry factor of 30. I’m not sure it’s a wonderful design, but it does follow the 5cm spacing nicely, and otherwise the material would have been wasted. Diameter is about 3’.
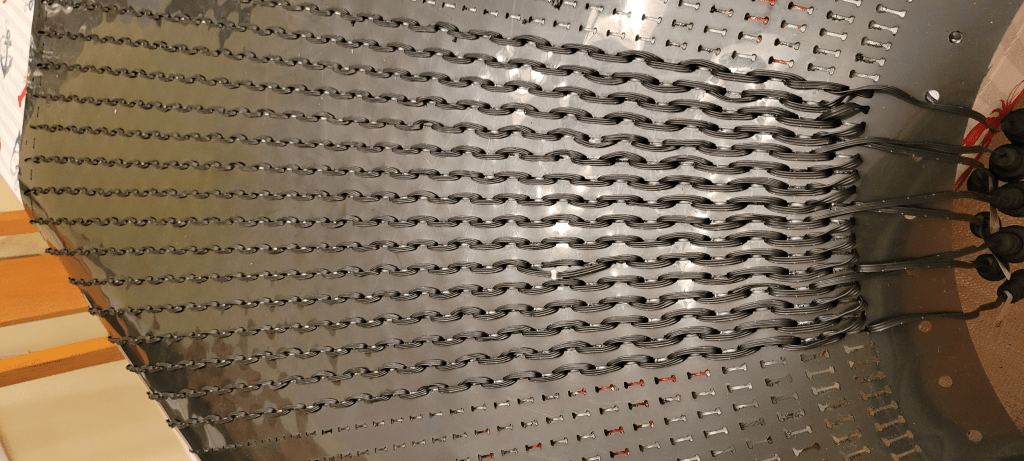
Spider Web (2000 nodes)
Although it has only seen two seasons, my gorgeous 8’ GE Mother of all Webs has started to deteriorate, and also had the misfortune of being populated with a bad batch of 2022 pixels which were also starting to fail.
Rather than just making another one, I decided to design a new web for seed pixels, again with the goal of using strings of 200 5cm pixels. This worked out reasonably well using 10 strings, one per web arm:
While this design does barely fit within the cutting area of the HolidayCoro process, I decided to break it into 5 sections. This was much easier to work with when it came to pushing the pixels, so I’m glad I did it that way. Zip ties were used to connect the pieces.
The basic wiring pattern starts at the center, goes out each spoke every other hole, goes halfway down one direction of the webbing and turns back, proceeding to the outer edge, at which point it turns around and heads inward, doing the other webbing halves. For details, see the custom model (below).
No cuts, no buts, no coconuts
Vector Files, Model Files, and Source Code
These designs were all made using JavaScript programs using the makerjs library. Per usual, I keep sources in a github project.
The JavaScript programs resulted in SVG / DXF files for cutting. As found in the repository, these are “cut inside” lines. You can also change to “cut on” paths or adjust for kerf. (The code is adjustable to make I or C shaped slits, by changing where it says “makeSlit” to “makeC”. Alan Hanson has tried C-shaped slits instead of I, these are cut much more quickly by the CNC machine. He says they work; I haven’t tried it.)
The resulting SVG / DXF files are in version control, even though they can be regenerated. This is to serve as a reminder of what exactly I had cut.
The tree does not need an xLights model, as the native model will cover a convenient wiring order. However, the spinner and web do need custom models. Custom models with submodels can be found in version control.
I’m always looking for things to add to my show that aren’t just more “bullets in coro”. While they do have bullets in coro, the Boscoyo P5 MegaChromaStone also has a P5 panel, which can be used for matrix effects at 64×32, which is enough to be interesting compared to tombstones with bullet matrixes. So, I grabbed a few, along with the corresponding panel kits from Wired Watts.
The tombstone kits I received did not come with instructions, or if they did, I did not locate them. You probably don’t need any manual, as the build is straightforward. It’ll likely take you half an hour to build a P5 tomb, but if you spend 5 minutes skimming my notes, it’ll probably only take you 35 minutes in total.
Build Options
There are several options for the panel part of the build. You can use a variety of panels and controllers, but I’ve opted for the Chameleon Panel Panther Dumb Receiver for mine. This is a slick, relatively inexpensive little board that takes pixel data from a controller long range differential port and uses it to drive the panel. While the Panther can drive some additional pixels (such as the tomb outline), I’ve opted not to use this feature. (My reasoning, since you asked, is that I always fly by the seat of my pants, and I always have pixel ports nearby, so just plugging the pixels into a controller port would be the easiest thing to field-adjust or fix without opening the tomb. I also mostly use 12V pixels, and the power supply in the tomb is 5V. So, no sense making the build more complicated, just to not really use the pixel capability in the field.)
Overall, this will be the simplest configuration to build… just plug in AC power, plug in differential long range data from any controller (if using the HinksPix controllers see my post about the pinout), plug in the outline pixel string, and ready to run.
Parts Needed
The Chameleon Panel Panther Outdoor P5 kit is reasonably complete, including the panel, housing, gasket, power supply, cord+gland, data cable, DC power cabling, controller card, mounting plate, and assorted screws.
In addition to the kit and aforementioned tombstone coro from Boscoyo, the build will also need:
A string of 100 of your favorite (or, after what happened last year, least unfavorite) 12mm bullet nodes
Small zip ties to hold the panel kit on the tomb, 4″ work well, black will blend in best
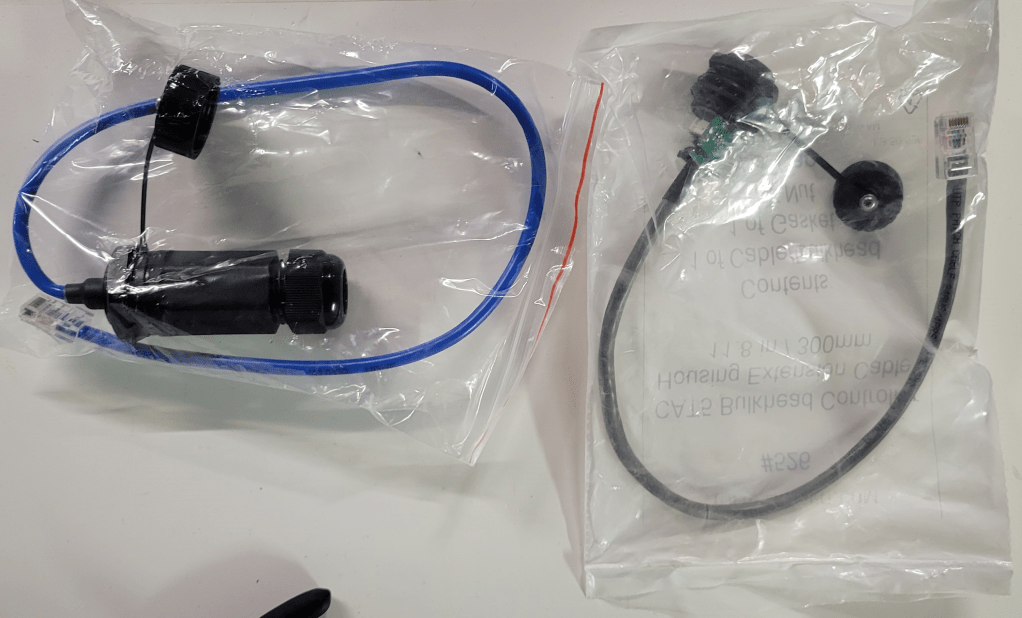
An RJ45 bulkhead for connecting the long range cable to the tomb; I would recommend either the Network Pass-Through Gland from Wired Watts (blue below), or the CAT5 Bulkhead from HolidayCoro (grey below). The former is a bit bulkier and watertight, the latter a bit cheaper and lighter but should face downward when outdoors. (They’re both fine choices that have served me well over the years. I am using the latter for this build, because I have a few spares here already.)
Assembling the P5 Kit
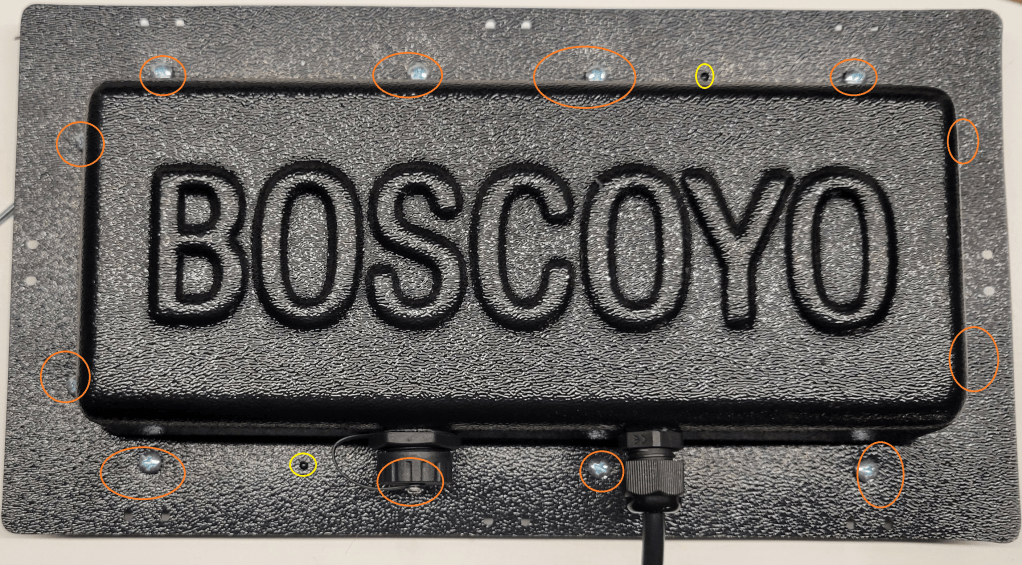
Cords
First, drill appropriate holes in the plastic housing. For this build, there is one needed for the data jack and one needed for the PG-9 gland for the power cord. (The larger hole pictured is for the jack, the smaller hole for the power cord.) Fit the bulkhead and power gland, and run the power cord through the gland.
PSU
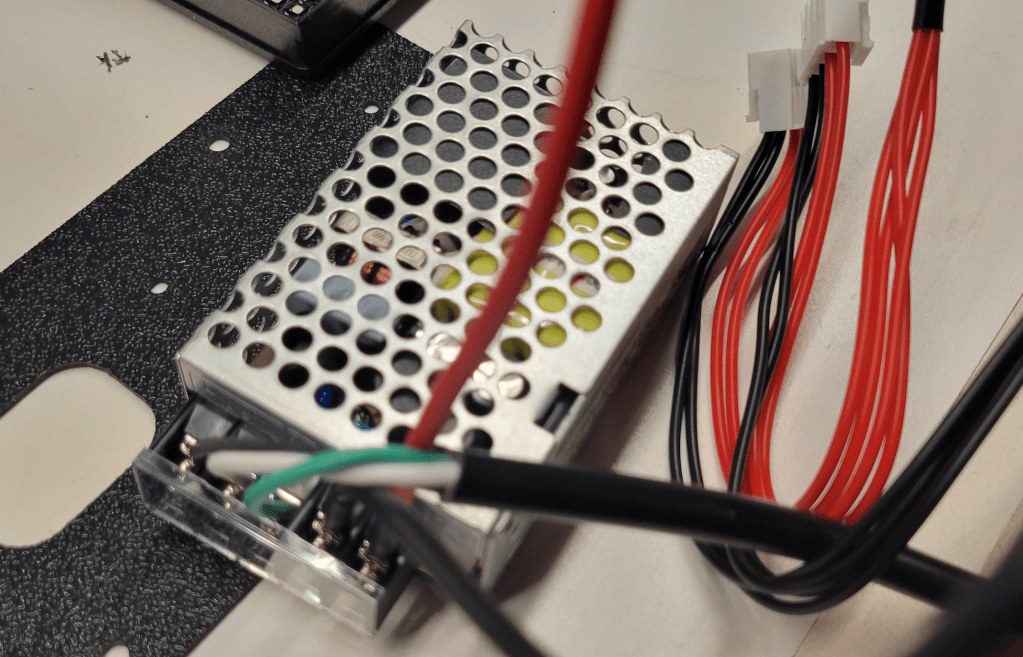
Next, attach the AC cord and the DC power splitters to the included power supply, and replace the terminal cover.
Attach the power supply to the thin black plastic mounting plate using two small screws in the kit, in the orientation shown.
Then, in the two plate holes nearest the PSU, install the self-tapping screws to hold the plate to the panel.
Controller Board
Next, mount the Panel Panther board to the back of the panel in the orientation shown. Use the little white spacers between the board and the mounting plate.
Attach the HUB panel data cable between the panel and the board. Attach the DC power connectors, one to the Panel Panther board, and the other to the P5 panel.
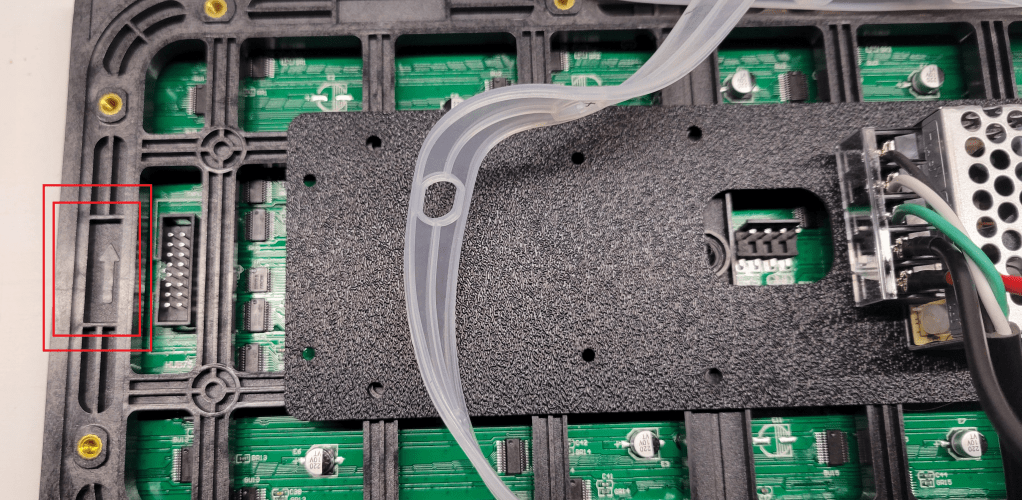
DIP Switches
There are two little red DIP switches on the board (see image above). Turning #2 on puts the board in test pattern mode. Turning on #1 causes the board to blank the image shortly after data signal is lost; with the switch off it will hold the image indefinitely (until more data is received, or power is lost). I have switch #1 on, and #2 off. (2025 Note: I believe that some boards are shipping with a different firmware this year and had to set #2 on. The new purpose of switch #2 is to choose panel 1 vs panel 2 in a chain of 2 panels. I did not try this, but debug function can supposedly be accessed by jumpering pins 2+4 on the header. See the WiredWatts website for updates.)
Cover
Attach the data cable from the bulkhead to the port on the board (see above).
Do you feel lucky? If you feel lucky, make sure the gasket is oriented properly (little black nubs should poke through holes in the gasket) and install the screws that hold the plastic housing to the panel. (If you do not feel lucky, maybe you should test things before you screw the cover on. 2025 Note:I assembled mine this year without testing and regretted it, the DIP switch settings have changed since 2024; testing before putting the cover on is now recommended here at merryoncherry.) This is one of the times when you should put all the screws in loosely, then tighten, probably from the center out toward the edges.
Final Assembly
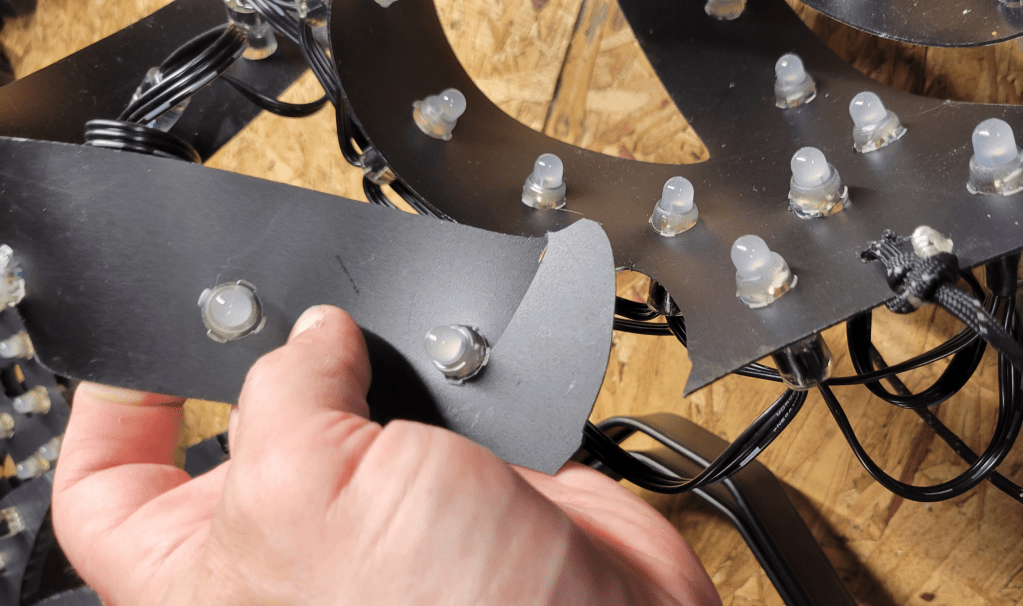
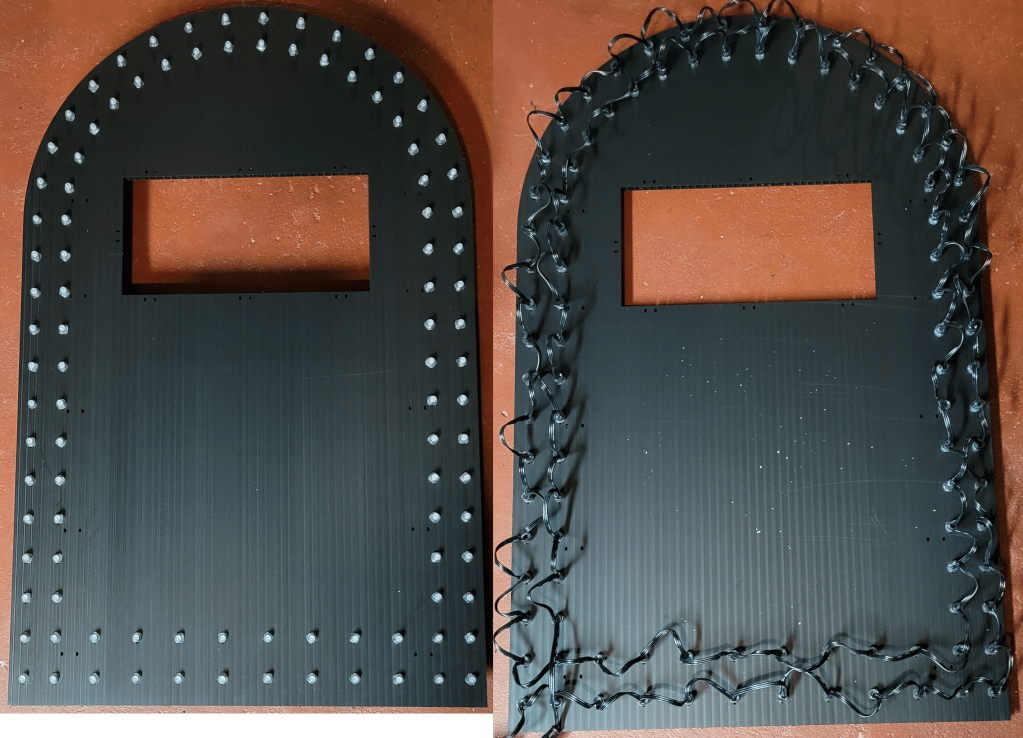
Push the border pixels into the coro, as one does. The vendor model has the pixels starting at the outside bottom left (when viewed from the back), going across the bottom, and proceeding counterclockwise around the tomb twice.
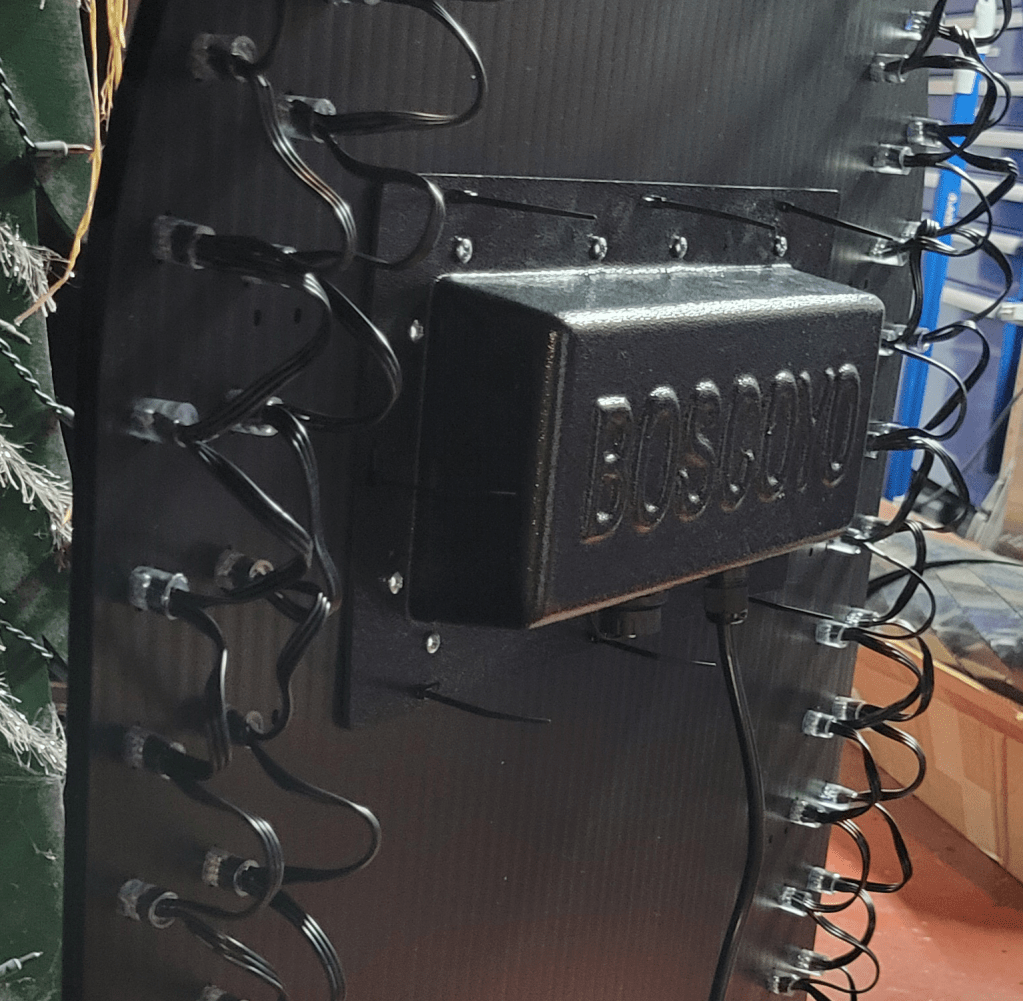
Ziptie the assembled panel matrix to the coro.
Whatever you do, do NOT trim the ends off the zip ties! Just kidding, do whatever you want, no judgment.
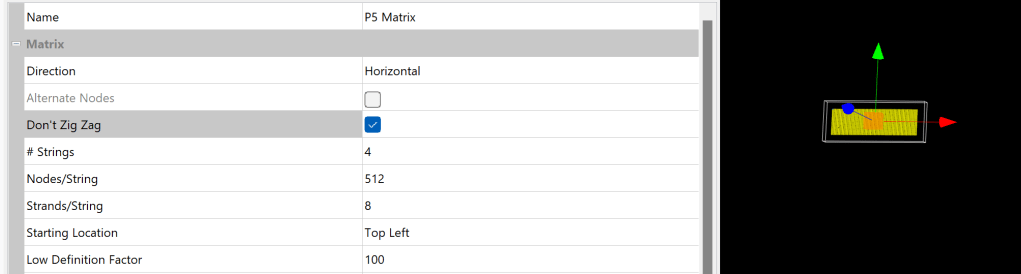
xLights Setup
xLights setup for the matrix is reasonably straightforward, with a small wrinkle in older versions of xLights. Add a horizontal matrix with 4 strings of 512, 8 strands per string. The wiring does not “zigzag”, meaning each row starts on the left rather than going back and forth as one often does with a pixel string. This “Don’t Zig Zag” option was added in late 2023, so if you don’t have it, either upgrade to a newer xLights or use a custom model like this one for the matrix. (Or, I suppose, set the controller zigzag, if your controller offers that, but not all of them do.)
When setting a controller connection, if you see any stuff about smart receivers, make sure it is all set to dumb.
One thing I wondered about is whether the P5 panel would be brighter or dimmer than the surrounding pixels. I used 12V resistor nodes, which are known to be a bit dimmer than some of the other pixels, and thought the balance was close enough – no need to dim the panel or the pixels.
Another question I had was to the gamma setting. The panel must have some inbuilt correction; I did not need to set it to 2+ like many WS2811 pixels, but did find it to benefit from a setting of about 1.3.
Conclusion
Overall, the panel kit is well-thought-out, and easy to build. I’m quite satisfied with how these turned out. I’ve wanted to play with panels for a while now, and this was certainly a really easy way to get started. It’s also nice to have some little matrixes in the yard, adds a bit of variety, so I will definitely be putting a few of these in the show this year!
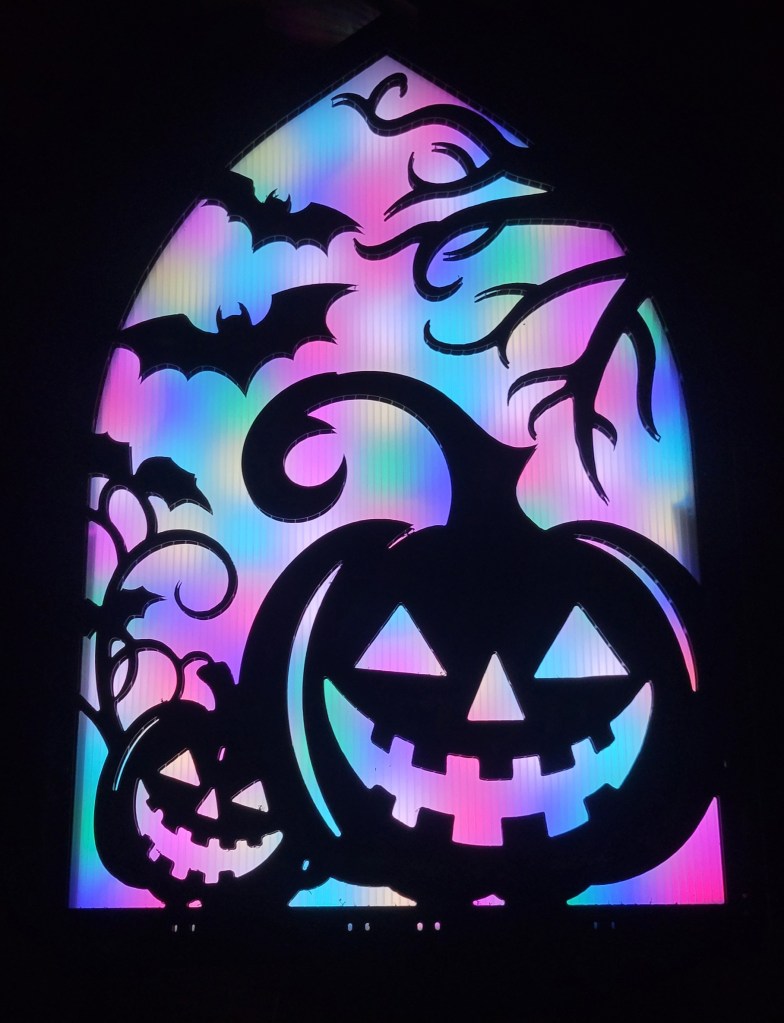
While you wouldn’t know it from most of the stuff in my light show, I have gotten rather tired of the “bullet nodes in coro” look and am interested in branching out whenever I can. Thus, the Boscoyo ChromaGlow TombStones caught my eye.
(Yes, technically these stones are just bullets in coro. However, with the front diffuser and detailed scenes, they have the potential to be so much more.)
I have 6 ChromaGlow presents for use at Christmas. So, it made sense to order one of each of the 6 Halloween designs to take their place in the Halloween show.
First Impressions
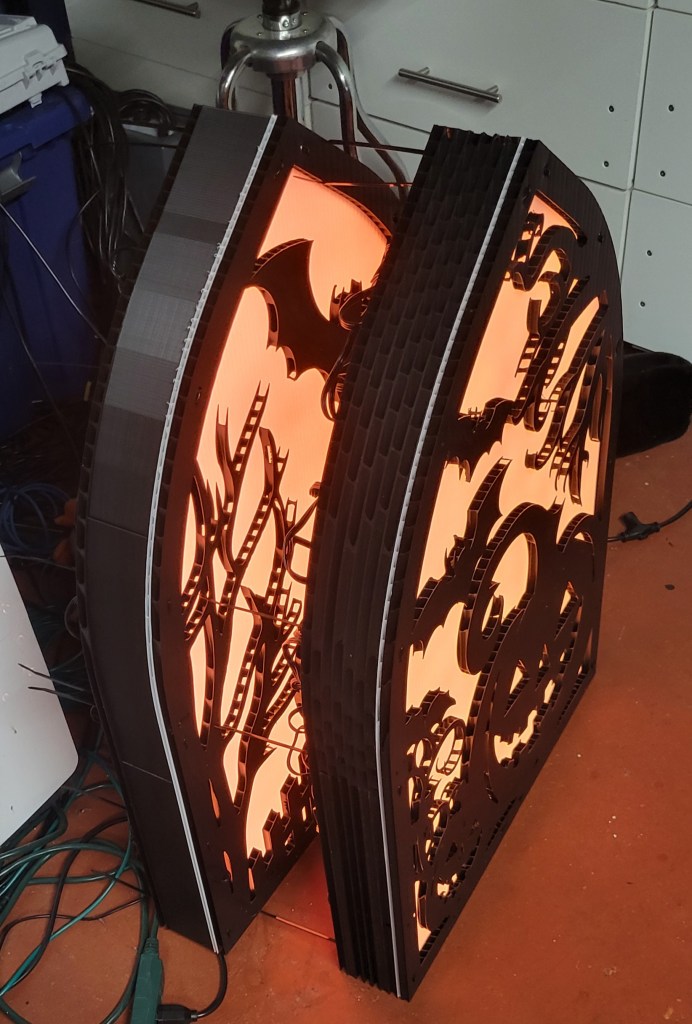
To be blunt, the first impression was that the front diffuser is too close to the pixels and that the hot spots are very distracting:
But I had ordered 6 kits. So, I borrowed a few of the coro pieces to make a thicker tomb and found that 6 layers (60mm) is much better than the 2 layers (20mm) that came with the kits:
Adding More Spacers
Now that I knew I wanted about 60mm of space between the back pixel coro and the front diffuser, I wrote to Boscoyo sales and asked if they’d sell more pieces.
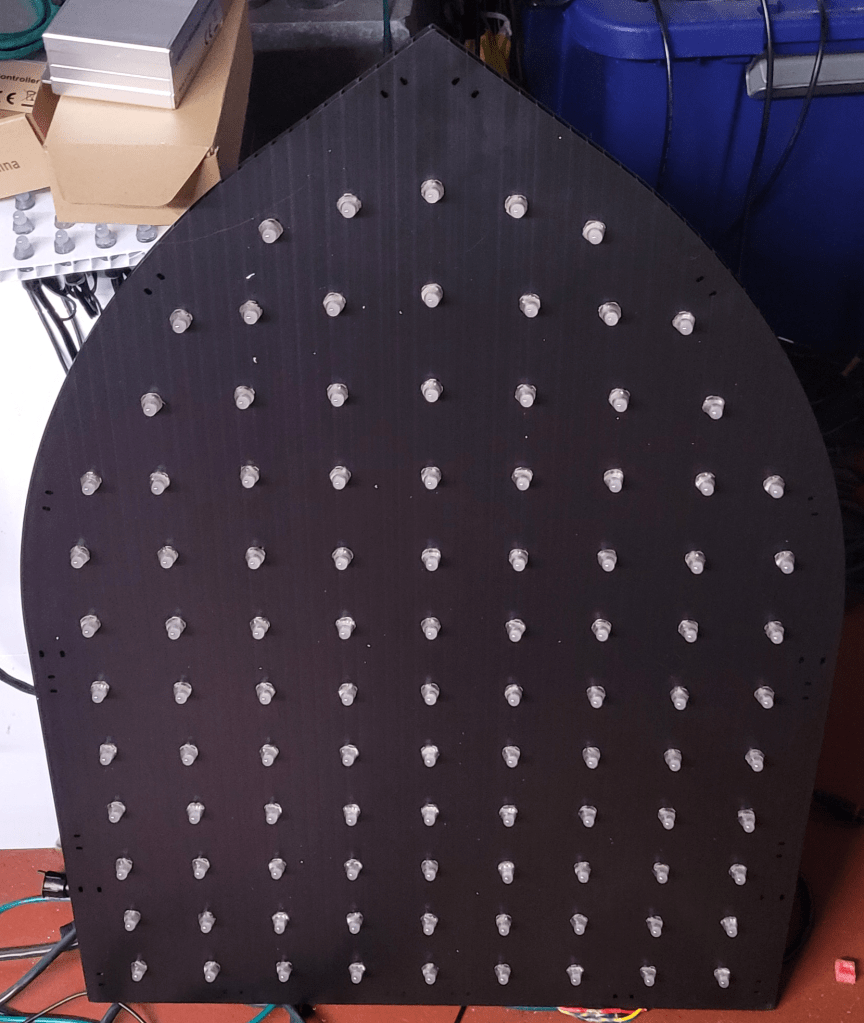
Before they got back to me, I was cleaning and found 2 rolls of black PETG printer filament from a few years back. Why not 3D-print the spacers instead?
I’m not an expert in 3D printing by any stretch, so I set out with TinkerCad to replicate the tomb outline (within ~1/8″ tolerance, as nobody can tell in the dark).
There was not much to this, just some rectangles, circles, and holes grouped together. I printed a very thin version, placed it over the tomb, and made a few 1/8″ corrections to the hole locations.
I then printed at 2.5″ thickness:
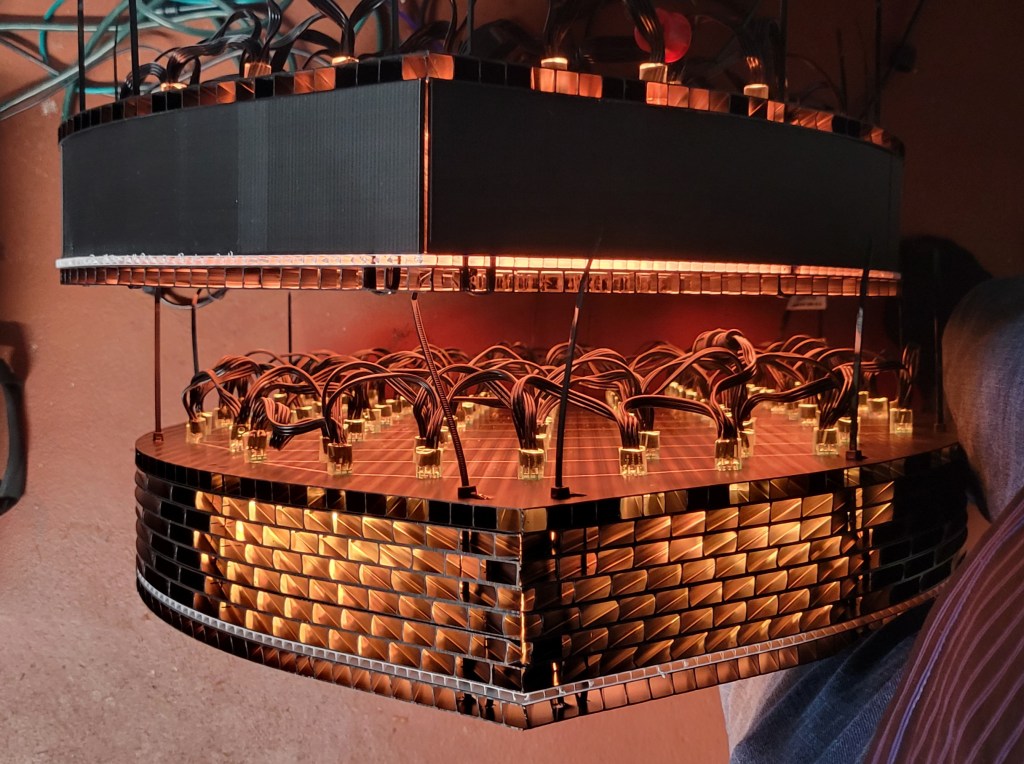
Assembly
The ChromaGlow Tomb is just a ziptie sandwich. I am using 12″ zip ties to go from the back, through the coro, through the spacer, through the diffuser, through the front coro, and back again through all the layers.
I do rather like how the 3D print parts worked out compared to the coro spacers:
(Though honestly, the orange glow is cool, reminds me of the vacuum tubes in old radios.)
Pixel Selection
This project uses a 100-count string of 12mm bullet nodes.
Because of the translucency, I would suggest using the brightest pixels you can find, such as:
Old-school 12V regulated pixels
12V GS8208 pixels
O.G. 5V pixels that use 16-18mA per channel
You can see from the picture below that the GS8208 pixels (on the left) are a bit brighter than the 12V WS8211 pixels (on the right); this also has the side-effect of making the color seem purer in ambient light:
3D Printing Files
I did not optimize for material consumption, but let’s just say I used more than those 2 spare reels while making these spacers. The outline is divided into 6 pieces, so print 2 of each file below (after stretching to the height desired, it’s currently set at 1″ but I stretched all mine to 250%.
I like how these turned out, and think they’ll look great in the show. I think I’ll start by putting them in the floods group in existing sequences, though I may also try a mini-matrix configuration for fire effects and similar, so updates on that as warranted.
My show is like a crummy commercial for vendors. Without the sequences from vendors and individuals, all I would have is a lifeless mess of tangled cables and plastic cardboard.
Veterans Day 2023
This was a short loop run only on one day (11/11/2023).
This show is a 2.5 hour run without repeats (unless I make a mistake). There are generally only a few additions/removals, and a few rearrangements from one night to the next.
[Update 2024: EZRGB asked me about including this in EZSequence, and I said it’s open source so of course. Also, it sounds like a great idea to help other people enjoy these products. I think they got it, or used the tool to generate effects… the wands are working in their free xLights Around The World Sequences].
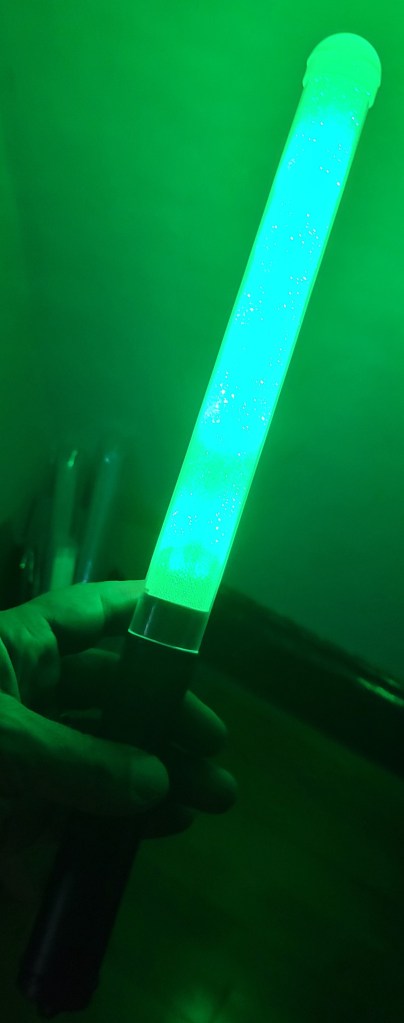
For several years, blinky people have been using wireless light wands, bracelets, etc., that have their colors synced with the rest of the light show. There are plenty of end-to-end instructions on how to set them up, from configuring the DMX port and transmitter, to adding effects to your sequence.
There’s only one problem for lazy people such as myself who purchase all their sequences from vendors: How do you get the wands to light up when there aren’t suitable effects in the package? You could do some sequencing, of course, but what if you have a real pile of dozens of sequences on hand and not that much free time? Maybe map the effects for a flood light, but not all sequences even have those…
So, we (Matt over at Cargo Lights did a lot of the testing) set out to automate, or at least take the drudgery out of, the process…
Wand Characteristics
Before attempting to sequence for the wands, I learned a few things about them:
The wands change color right on cue, but don’t update at the full 40 FPS we expect in our shows. Maybe 8-10 FPS.
You might not want to run the transmitter full time, as it can cause interference (most reports mention car key fobs). You’d best only trigger it when the wand is changing color. So, you make a control track that activates the transmitter only as needed.
Automatic Sequencing
Based on the wand characteristics, I decided to write a program to generate the wand effects track. In response to events, such as a big color change, or a beat in the timing track, the program will pick the most popular color on a specified model (or set of models) and apply it to the wand. (It can also be set to alternate between popular colors on the beats.)
This approach, while simple, gets decent results, especially given how quick it is. (In the video below, the large glowing spot in the middle of the driveway represents the color the wands will show.)
Using the Program
Now, the program is a bit involved because it uses the .xsq file for the timing marks, the show folder to get the network setup, and the .fseq file to establish the popular colors. The steps are:
Open the original sequence, render it, and save it. (Also be sure your controllers and layout are saved).
Watch the sequence, to pick a prop or two with the colors you want to follow.
Identify the name of the timing track for changes, often beats, drums, or similar. If there is no timing track, try using the vamp plugins to generate beats.
Run the python script to generate a new .xsq with the wands in it.
Open the wand sequence, and cut+paste the effects into your sequence (or alternatively import them).
Once you have all the required information, you are ready to run the python script. Here’s a basic example:
Be sure to change the blue part to match the paths on your system, and the green part to match the sequence information. The pink “changecolor” option is also frequently used; a value of “0” means that it will just take the most popular color, a value of “1” means that it will attempt to change colors on each timing mark. “1” is a good choice for songs with a strong beat, “0” is better for subtle songs, or songs where the beat isn’t perfectly detected.
The following additional configuration parameters might also come in handy:
    --targetmodel: Target model for colors information
    --targetcontrol: Name of target model for control pulses when using 5-channel tx
    --ch1val: Control Channel 1 (ID) value, defaults to 85 for 5-channel tx
    --ch2val: Control Channel 2 (Group) value, 3 for zone 3, or 0 for all zones
    --controladvance: Milliseconds to advance the timing of the control strobe
    --coloradvance: Milliseconds to advance the timing of the color
    --controlwidth: Milliseconds to hold the control signal
    --controlgap: Minimum milliseconds of gap to wait between control pulses
If your DMX transmitter is not split into models called “DmxWandsCtrl” and “DmxWands”, you will want to override these defaults using the green options. If you want to set a specific group / zone, be sure to specify –ch2val. If you want to adjust how much time elapses between updates sent to the transmitter, or if you want to adjust the timing of the wands relative to your other effects, look into the settings in blue.
For fine tuning the colors selected, there are additional parameters. These affect how different two colors have to be to be considered different, how bright a color has to be to get selected, and thresholds for triggering events based on color and brightness changes. For example, if you think the colors chosen are too similar, and want them to be more different, you might set something like:
   --similarityh 12
   --similaritys 12
The defaults are reasonable but, if you don’t like your results, see the help and try some experiments.
Good luck*. If you find a bug or find some interesting settings, feel free to email me at any address at merryoncherry.org.
*A Note About Obtaining DMX Wands
I got my first transmitter and wands from Wally’s Lights. I recommend this, certainly if you are just starting out with wands, and maybe forever. I did try to get a cheaper batch from the China manufacturer, and learned the hard way that they don’t all use the same control scheme, and the vendor might leave off the on/off switch and color change button, which means the wands won’t be as fun for kids to take home after your show.
*Notes About DMX Troubleshooting
The wands “just work”. However, if they don’t, there is not a lot of feedback on the transmitter unit to tell you where the problem may be. Here are some things to try:
Make sure you are using a DMX port that you already know how to use. (Some require a full 512 channels configured, etc.) Probably best if you use a cable you trust also. (I have a handy DMX to DC board with 30 indicator lights, it’s an easy way to tell if the signal is being sent.)
Make sure the transmitter ID channel is going out, and there are no brightness or gamma adjustments applied by xLights or your controller — that would change this number and the transmitter would ignore your instructions.
What do you do if you have the perfect spot for a matrix, and you know the resolution you want, but this leads to a pixel spacing (say 1.25″ or 1.4″) that is not widely available?
“White hristma”
In my first year, I decided I wanted to put a matrix over the upstairs double-wide window on the front of the house. At 2″ spacing, it made sense to have the matrix be 32×24.
That worked. However, I later found out that I really like Superstar matrix sequences, which are generally 50×24. So, the 24 rows turned out to be a serendipitous choice, but a width of 32 pixels is not enough. Scaling looked wrong (these sequences have a retro, blocky look), but not scaling causes the edges to be cut off:
Custom Matrix From HolidayCoro
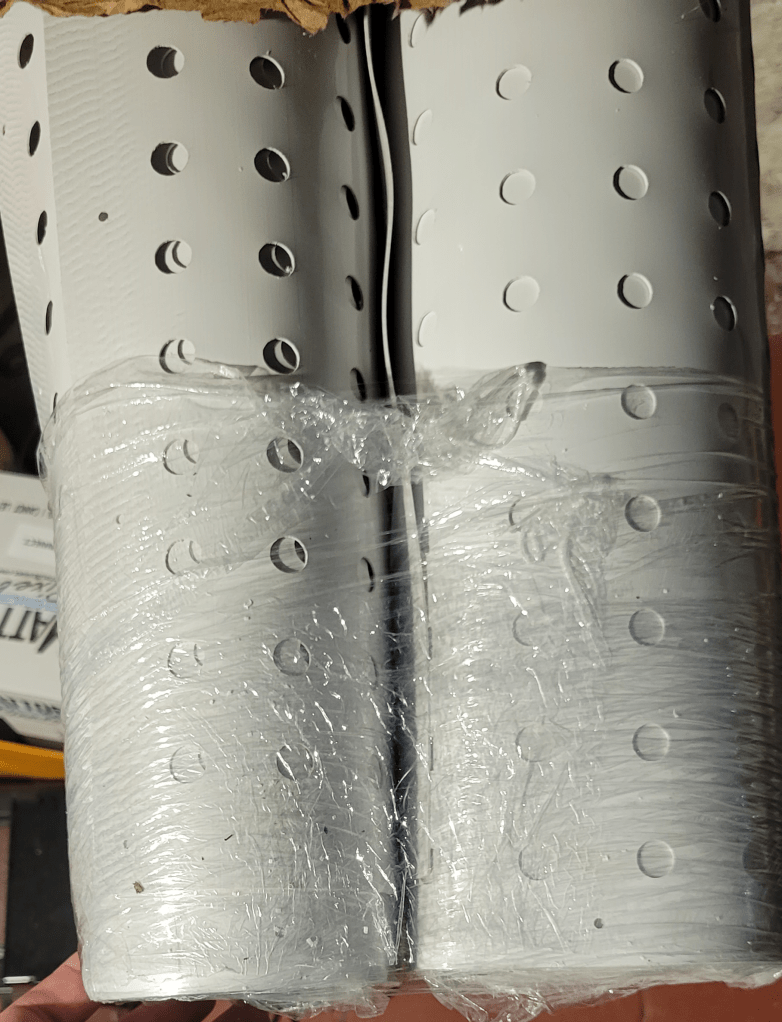
This year I found out that, if you email them, HolidayCoro will make HDPE with pixel holes in any spacing you want. The finished sheets are almost 8′ square, which is bigger than most “off the shelf” matrix nets from other vendors.
For my window, and some other purposes, 1.4″ spaced and 1.25″ spaced matrix seemed like the way to go, so I ordered 2 sheets of each.
Results
The material arrived quickly, as their products usually do.
The bullet pixels I used (theirs, which have a 3″ spacing that needs a little less power and is a smidge lighter than 4″) fit properly, so assembly was relatively easy.
The end result was also what I expected:
Yes, yes, I know you all think it is supposed to be black (which is also available), but I like white OK??? (And yes, I used the 1.25″ instead of 1.4″ to leave a little margin between the matrix and the frame.)
Final Thoughts
This was a simple project that fixes a minor thing about my display that was really bugging me (maybe you know the feeling?).
Per square foot, this worked out to be the same price vendors typically charge for standard 1″ or 2″ spacing (or maybe even a little cheaper), so if you think a custom spacing would be useful, I wouldn’t hesitate to inquire.
Update April 10, 2023: These were shipped in xLights 2023.06.
Update March 28, 2023: After discussion with other developers, the word “elide” has been changed to “suppress”.
Introduction
I am easily dazzled and mesmerized by spinner-like props… anything with rotational symmetry. While the crowds only seem to care about singing faces and whole house effects, I can’t help it… I love detailed effects on HD props. That’s why, for 2023, the number one thing I had to have is a Showstopper Spinner, which is what I’ll be using for many of the examples below.
Now, it turns out that using HD props can be hard work. It all comes down to whether it works well in your sequence… to get results like the video above, you need effects to show it off, and most of those effects rely on submodels.
As a prolific importer of OPS (Other People’s Sequences), I need easy ways to import the effects from the props the vendor sequenced to props that I actually own. This is often made easier by adding submodels and groups to the models, or otherwise adjusting the submodels to suit my preferences, so there are suitable targets for imported effects.
Of course, adding submodels can be quite tedious and error prone. I suffer the three virtues of a programmer, and would much rather spend a day working on code than an hour clicking pixels in the submodel dialog. So, I added some utilities.
Rotational Symmetry
One of the most painful things with submodels on spinner-like props is getting perfect rotational symmetry. It seems to be a tedious, manual process, and a lot of models out there have a pixel off here or there. (The early version of the Showstopper Spinner is no exception; it’s understandable really, and they’re still working on it.)
So, let’s make the computer do it! (I am going to assume some familiarity with the basics of submodel dialog here. If you need a refresher, I recommend the Pixel Pro Displays video, or others like it. But stop after you make the first strand!)
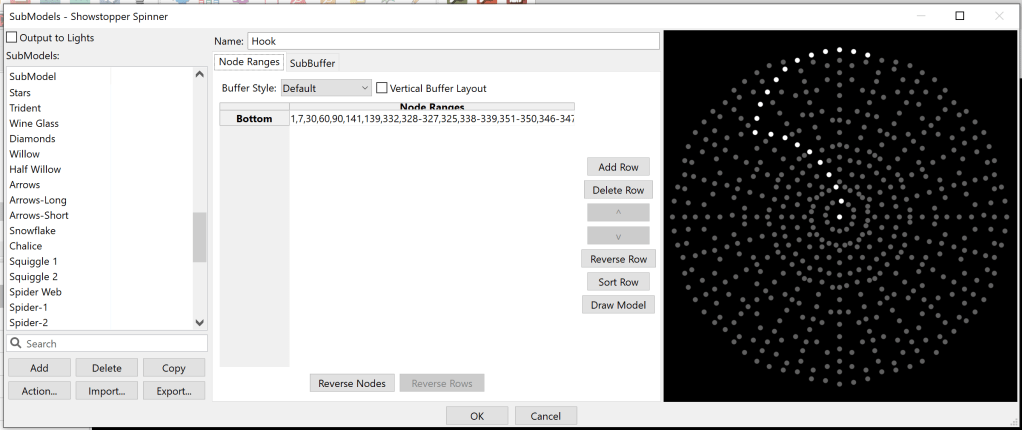
Open up the submodel dialog, add a new submodel, and draw something interesting.
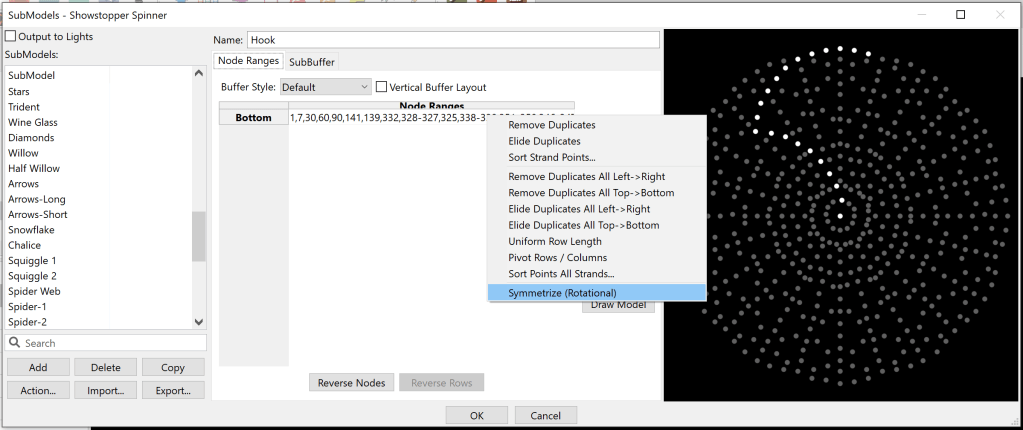
So far, so much the same. Now, right click (in xLights, if in doubt, try right-click!) and pick “Symmetrize (Rotational)”
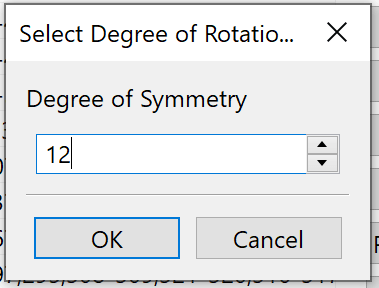
It will ask for a degree of symmetry. This will be the number of copies when done. For the Showstopper Spinner, 12, 6, 4, and 3 are good. I’ll pick 12 here.
In this case it will also ask if there is a center node. (It only asks if it thinks there is one.) (Likewise, if it thinks your model is squished horizontally or vertically, it will ask if you want an aspect ratio correction. Try it.)
And here you have it… 12 copies!
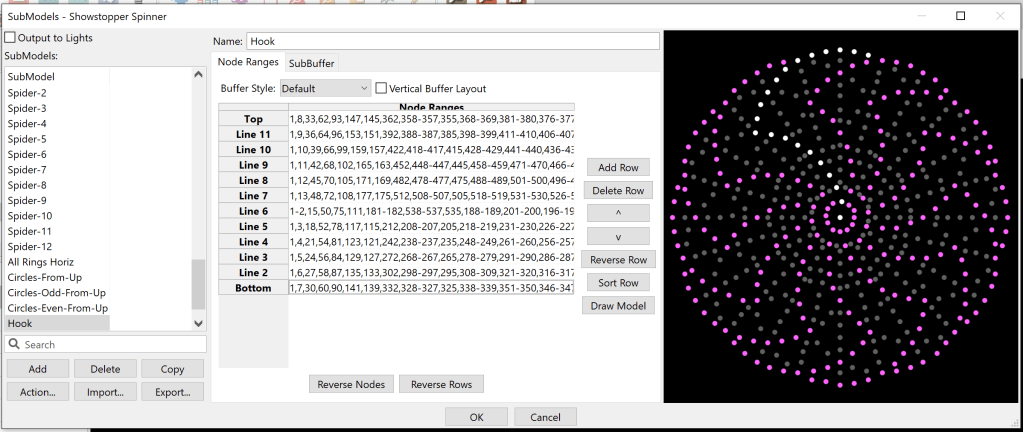
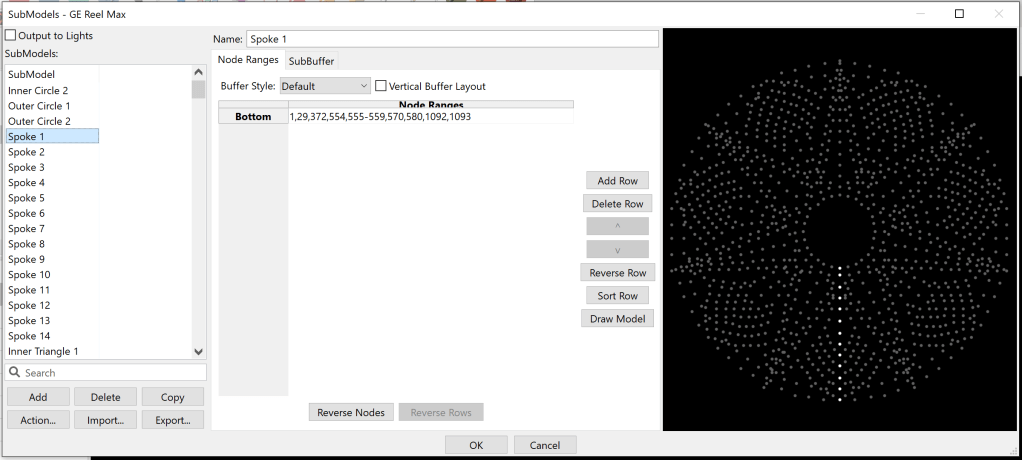
Known Limitations: This does not work on props that don’t have perfect rotational symmetry, such as the beloved Hattitude (which has a bunch of stuff superimposed on the spinner) or the SpinReel Max (which is not quite symmetrical if you look closely… some branches are separated by 4 pixels, and some only 3…). If you get an error, a log will pop up. If you think it is in error, please send me that log.
Multi-Strand Submodel vs. a Group of Submodels
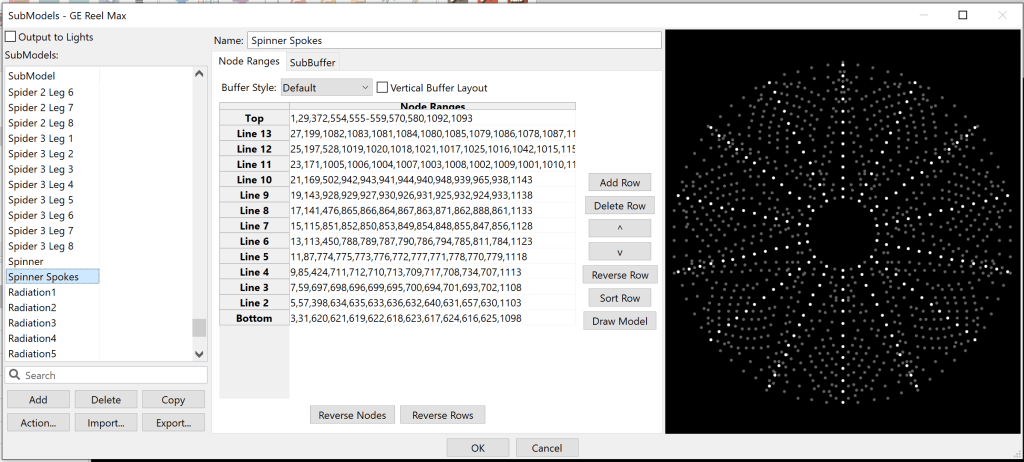
Some models / vendors use groups of similar submodels and then sequence to those groups, allowing the group to have disparate stuff under the same group name for easy import, and to arrange the group order to suit render order. For example, a spinner is a group of individual strands, in the “All Spinner Spokes” group:
Just add all these to your spinner group….
Another approach is to make a multi-strand model, which has the benefit of being a lot less cluttery:
I’m not here to take sides on the debate, but rather to tell you how easy it is to convert between the two schemes. For combining many submodels to one, there’s always been a “Join” feature on the right-click menu:
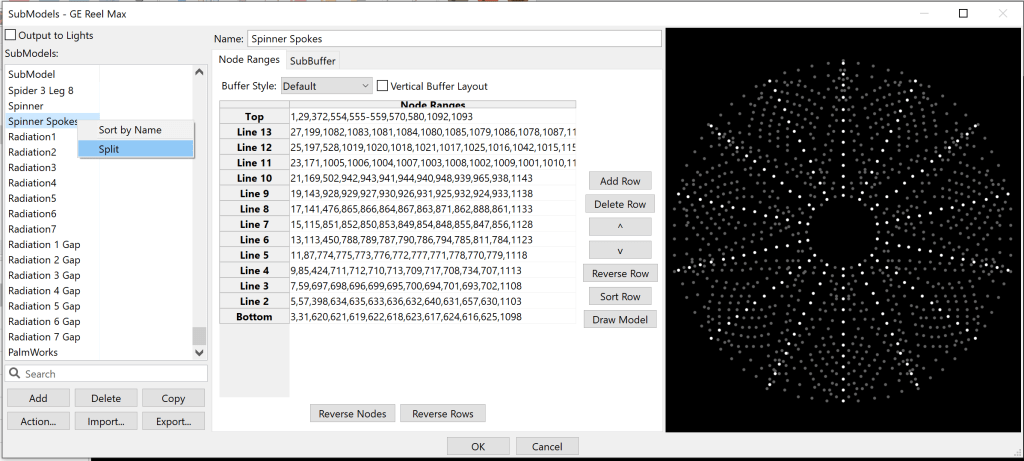
However, going the other way has not always been easy. For that, you can now right click and choose “Split” to make multiple submodels from a stranded one:
Note: The name of a joined submodel is “Submodel-<n>”, which you can rename. The submodels created by “Split” are named after the source model.
Sorting Nodes Geometrically
Picking the nodes for a submodel may be tedious, but picking the nodes for a submodel in the perfect order for chase effects is very tedious. The existing xLights feature to “Sort Row” is good if the numerical order of the pixels is working in your favor.
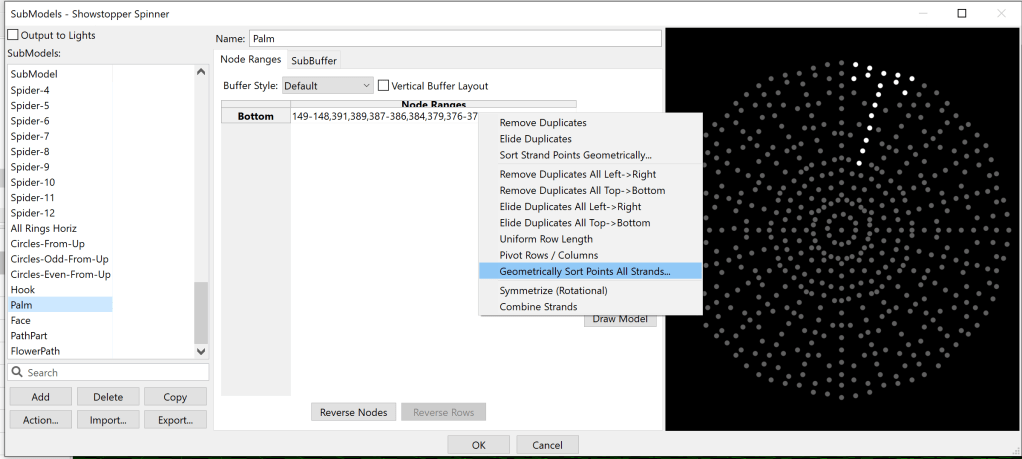
If the order is geometrically simple, there’s a right-click option for you…”Sort Strand Points Geometrically…” or “Geometrically Sort Points All Strands…”
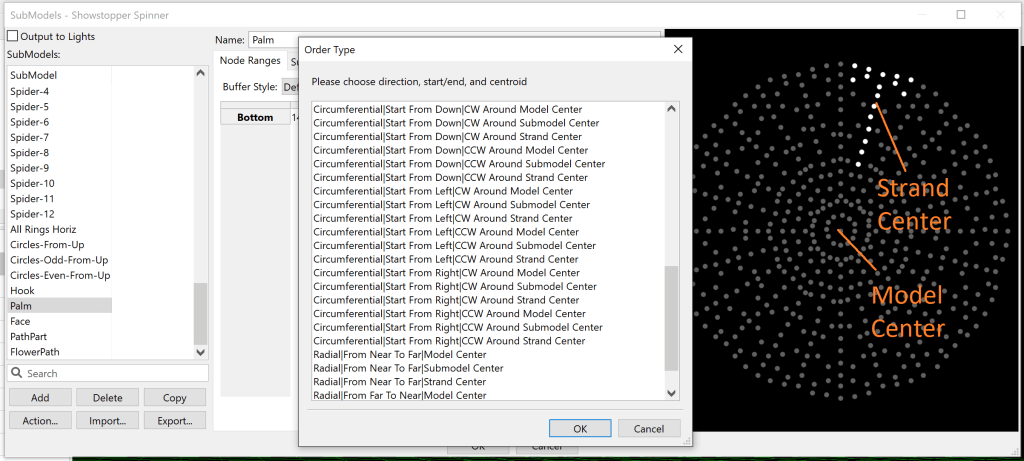
The choices presented are admittedly a bit daunting:
Some descriptive examples may help here.
Say we want our palm tree (above) to light up from the bottom of the trunk and head toward the fronds. This is a Radial motion, where the points are sorted by distance from Near To Far relative to the Model Center. If we wanted the reverse motion, we could pick Far To Near, or if we wanted the model to light from the middle of the tree outward toward the fronds and trunk, we could pick Strand Center.
For the next example, let’s look at Circumferential motion, which is motion around a point, not toward/away from it. The Showstopper Spinner has these really cool circle submodels, and if you put chase effects on them you can see that the chases start from the inside of the model and work their way clockwise around it:
Let’s try something different… what if we wanted all the chases to start at the top of their circles, and go counter clockwise? In that case, we would choose a sort that is Circumferential, CCW Around Strand Center, Starting From Up:
Now, our chase effect looks like this:
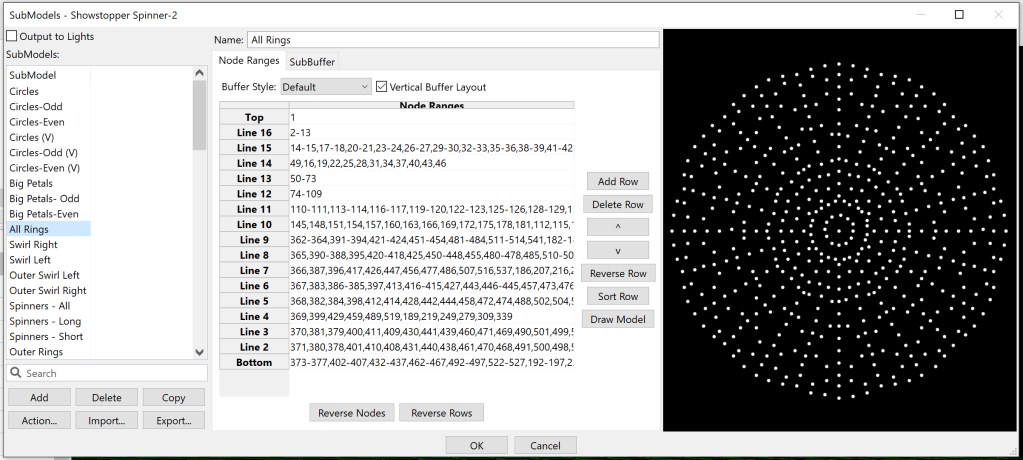
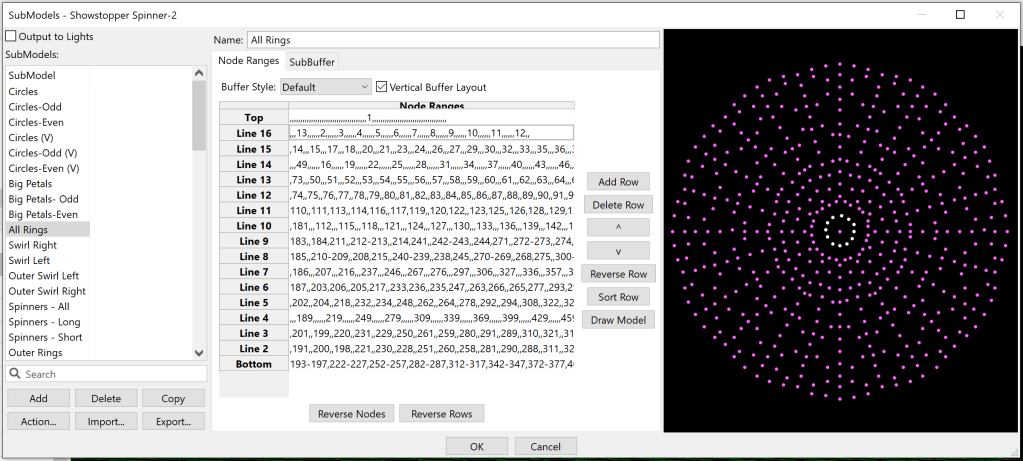
For our last example, consider the spinner’s “All Rings” submodel:
Note that it is a “Vertical Buffer Layout”. If we do a color bars “Left/Right”, we may hope that it would wash in and out on the model, and that if we did “Up/Down” it would go around the outside of the model. The first one works, the second one isn’t what we might prefer for some applications:
The first thing we might want to do to make it proceed naturally around the rings is to use the geometric sort feature. Let us sort them from the bottom, clockwise around the model (That’s Circumferential, Start From Down, CW Around Model Center):
This is a bit better, all the bars seem to start at the bottom. However, we notice that it still looks a mess. The problem is that the strands are not all the same length / they do not have the same number of nodes. This makes the circumferential travel uneven, and is a good segue into the next section.
Evening Out Rows
Starting with the rings model above, we’d like to stretch out the rows so that there are the same number of nodes on each strand. We can use placeholder nodes, empty between commas, “,,”, to take the spot of a node.
To do this manually would be painful. Right click to the rescue… “Uniform Row Length”…
That’s a lot of commas… but did it work?
Caveat: You may not want to do this to the vendor-supplied submodel… if they sequence to it the results could be wildly different. This evens the spacing without any regard to geometric location, so it isn’t perfect. A few manual tweaks can improve it a bit.
(This example is a bit silly… the pinwheel effect done “per model per preview” would do the same thing in a much easier way, but so it is.)
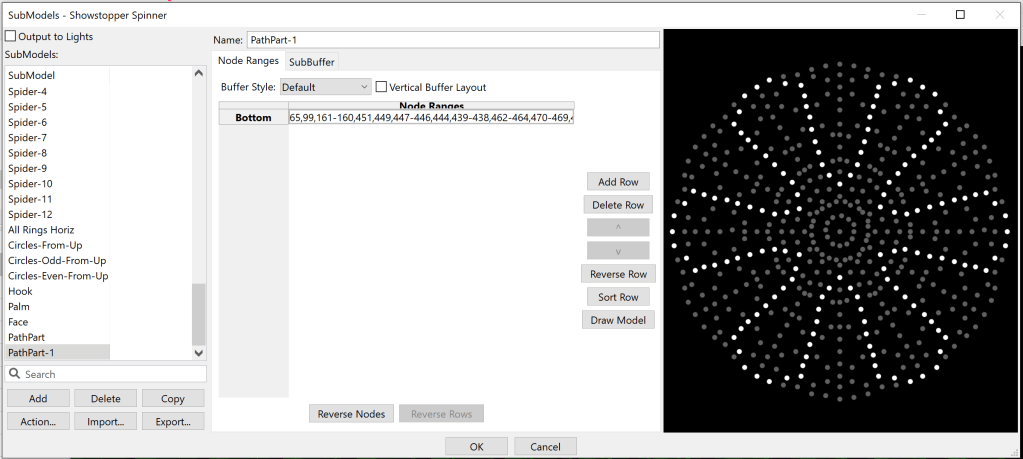
Eliding Duplicate Nodes
When generating submodels with rotational symmetry, it often turns out that the same node is present in more than one strand. For example, consider the circles in the Showstopper Spinner model:
Now, this seems fine at first. By design, we want all the circles to be the same, so they need all their nodes. However, this does have a couple of quirks:
When xLights renders to the whole submodel, it won’t know exactly what to do with the nodes that are present more than once. Generally, the first occurrence in the first strand using the node is the one to control it. This would make our first circle take priority over the rest.
xLights check sequence may complain about it (depending on the options selected)
In some cases, the result of parallel render algorithms will not be stable. (This may be of little consequence, unless you are doing regression testing of xLights.)
Now, perhaps someday there will be an improvement to #1 above. However, what if we want to establish which submodels have priority, and make rendering stable as of today? In order to do that, without changing the number of nodes in a strand or anything else that would potentially change rendering significantly, we just want to replace the duplicate node with “,,” instead of removing it completely. This is what I refer to as “Suppress Duplicates”, and it is available on the strand or whole submodel.
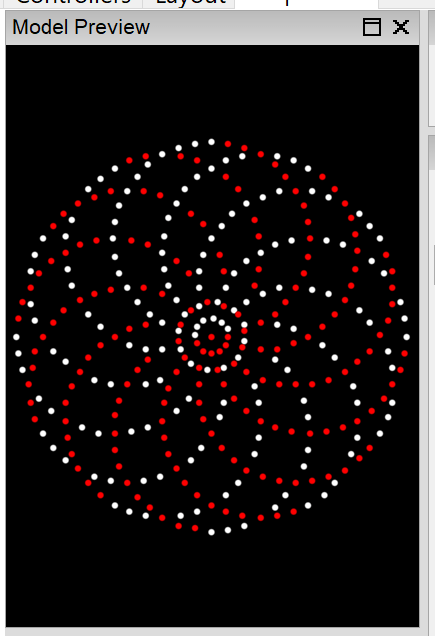
For the circles above, we may want all the circles to be treated the same, rather than the first taking priority. The available option would be “Suppress Duplicates All Left->Right” to assign the node to the first strand to use it as we read them collectively from left to right, as this will give the start of the chase priority over the end of the chase… the early part of the circle will be “in the front” and the latter part will be “in the back”:
We can see from subtle differences in the rendering that this has been effective:
Color bars on circles with duplicates in strands. Note asymmetry especially in the center.Result of rendering the color bars after duplicates were suppressed from left to right. Note that rotational symmetry is restored.
If you want the top strand to take priority over the bottom (perhaps there are duplicate nodes in your rings, or something), you can choose “Suppress Duplicates All Top->Bottom”. This also matches much of the current xLights behavior, if you want to formalize it.
Please note: Eliding the duplicates in this manner is a matter of preference. If xLighs ever has a better way to “break ties”, it would have been better to leave the duplicates in. But, if you want rid of the duplicates, this is an easier way, with less consequences, than other methods.
Manually Suppress Nodes
In the same way that one selects nodes by drawing a rectangle in the submodel preview pane on the right, and presses “shift” to cause that action to remove nodes from the selection, it is now possible to hold down the Control key and have the nodes suppressed instead of removed from the selection. This allows manual generation of knockouts.
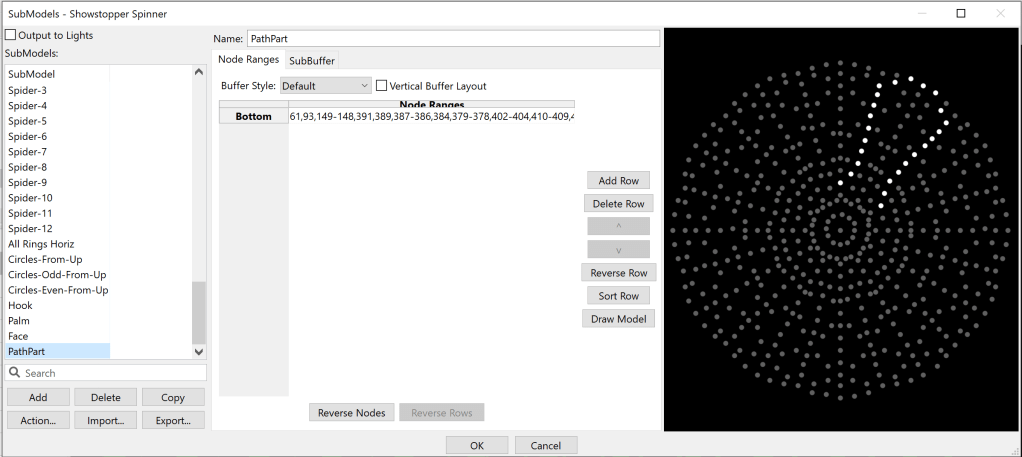
Making Outlines / Paths Around the Center
Sometimes, instead of a stranded model, the goal is to make an outline, or other path around the center of the spinner. This is a modest extension of the techniques already used above. First, start with a fraction of the path you want:
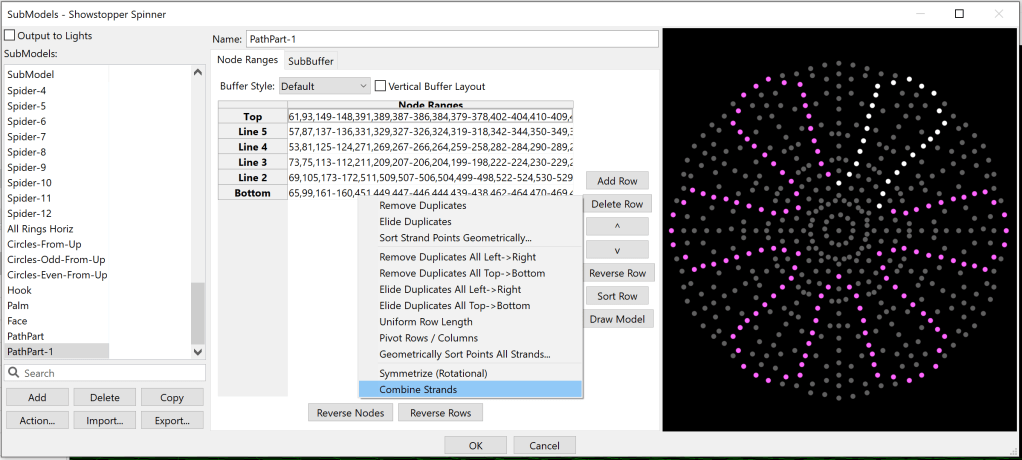
Then, symmetrize it. The next trick will be to pick “Combine Strands”, but before that, you might want to copy your submodel… you see, it could be that you don’t like the result of “Combine Strands”, and the easiest way to fix that is delete your attempt and try again…
Now, you have a new strand model.
This, however, is not without its subtleties, many of which have easy fixes:
If you are going counter-clockwise, you may need to push “Reverse Rows” before you “Combine Strands”
If you accidentally got duplicates in your strand, try right clicking and “Remove duplicates”.
If you don’t like the direction, maybe “Reverse Row” before you do anything.
If you don’t like the order, try a geometric sort either before or after “Combine Strands”.
It could take some trial and error… which is why I suggested playing with a copy of the submodel you want to turn into a path.
Conclusion
I hope you’ve enjoyed this post. If you get to use these options, I hope they helped you… maybe by taking the tedium out of some task, or getting a better end result in less time. Then again, maybe I should not wish it on you, and instead hope that you are able to use the models you get without changes, so that you don’t have to spend time on creating submodels at all. With the caveat that some of my preferences may not suit yours, or not match some of the vendor’s original design points, you are welcome to any of the models I use in my show.


